Welcome to my Photo Blog!
Bokeh Effect Explained
There is this weird thing in photography called "Bokeh" - often misunderstood as synonym for shallow depth of field. Yes, it is related to depth of field, but it is by far not the same. Bokeh is a Japanese word which means blur or haze, and is here in photography related to some artistic quality of the blur. The appearance of the bokeh effect mostly depends on the lens construction itself and the form of the lens aperture shapes. The more wide open the aperture, the better the bokeh normally - it is visible as circular patterns in the highlighted blurred background of a photo. The Christmas Light photo below demonstrates this effect with the circular pattern in the background. The photo was taken wide open at f/2.0 with a 135/2.0 lens.
It is mostly a matter of taste to like this effect or not - I personally love a beautiful and especially colorful bokeh effect in photos taken with a wider open aperture. Bokehs can look fairly unattractive at smaller apertures due to less circular shaped patterns (which means there are more edges visible leading to polygonal shapes and hard-edged bokeh). The more aperture blends a lens contains - preferably even with rounded edges - the better looking is normally the bokeh effect. The photo on the right was taken purposely to create this out-of-focus effect (135/2.0 at f/2.0).
How can we explain this effect from a technical point of view? In out-of-focus areas each point of light displays an image of the aperture of the lens, normally a round disc. Depending on the lens construction and the aperture used for the photo, you might see big full circular shapes, oval ones, or donut-like discs. The brightness of this disc largely depends on the lens correction, too (it means how they are corrected for spherical aberration). Some modern lenses use so called apodization filters to even enhance a smoother looking bokeh effect.
Often bokeh effects appear in the photo unexpectedly. When I took the shot shown below of a mockingbird (which was fairly aggressive against me when I disturbed it), I later found the nice looking bokeh discs on the left which fitted perfectly to the overall composition. This photo was taken at 400 mm focal length at a smaller aperture of f/7.1.
In my experience, the best bokeh effects can be often achieved by highlighted backgrounds, sun reflections from the side hitting foliage/leaves, light reflections on water or other shiny surfaces. You might see that some of your lenses are better than others in your collection to reveal a beautiful looking bokeh.
Prime versus Zoom
An old but often repeated question in photography - which kind of lenses are better, zoom or prime lenses? In my blog I share my experience by using both kind of lenses and where one is better than the other type.
When I first started many years ago in film photography, I herited two simple M42 thread based simple prime lenses with 28 and 50 mm focal lengths. I am still convinced today that starting out with a simple 50 mm prime lens (no need for a super fast lens copy at this point!) is the best way to learn about composition and photography. It still amazes me today what you can do with this focal length on full frame (this is the 35 mm film format). Just go a few steps forward or backward and voilà, you get the perfect composition even mostly distortion-free. It is a decent portrait lens to do either head shots at closer distance or family portraits from bit further away. And with a simple close-up lens or extension tube between lens and camera, the 50 mm lens can be converted into a decent macro lens, too - only to name a few examples. Recently I took this infrared photo below with my 50/1.2 prime lens - I had to walk to the right spot to frame it the way it is seen here, but no further processing was necessary in the composition!

Later in life I switched mostly to zoom lenses for several reasons: (a) Price: Decent zoom lenses are still quite a bit cheaper than faster prime lenses in a similar focal length.
(b) Convenience: the zoom lens covers a broader range of focal lengths which avoids changing lenses too often and having the risk of dust getting inside the camera and on the sensor. This can speed up the "snapshot" effort to capture something quickly - in case a prime lens needs to be changed first, the critical moment will have vanished for sure.
(c) Weight: Instead of carrying a bunch of prime lenses, one single zoom lens is easier portable which is a big advantage for travel or on hikes for example.
Seeing this, why would anybody bother with much more expensive prime lenses? Well, there are a couple of good reasons: (a) People often claim quality of primes having the edge over zoom lenses. This was definitely true in the past, but needs to be a bit more elaborated for more recent times. When comparing excellent prime lenses with newer zoom lenses at the same applied aperture, you will not see a difference easily. All big photo gear brands have now new top quality level zoom lenses which compete easily in photo quality with prime lenses in the same focal length. There is a different story for cheaper and slower zoom lenses, especially so called super-zooms which extend over a broad range of focal lengths (e. g. 28-300 mm) plus having some macro capabilities. I recommend to avoid super zoom lenses - their performance is very weak towards the long end (loss of sharpness and especially in contrast), and they tend to show more distortions at the wide end. A super zoom lens is an optical compromise to make the best of covering a broad focal length range. By knowing its limitations it can be still used sometimes in a decent fashion under good light conditions - I also own one of those fairly cheap super zoom lenses, and I used it a few times for short travels where I couldn't take a lot of gear with me. I was lucky enough to get this close up photo of a sea lily done with my 28-300 macro zoom lens from a distance!
(b) Speed: In my opinion the biggest unbeatable advantage for a prime lens - the main reason why I went back using mostly fast primes. Prime lenses in general have the same speed or are faster than zoom lenses. My prime lens setup consists of the 35/1.4, the 50/1.2 (and 50/1.4 which is also very good), the 85/1.8, and the 135/2.0. Together with a 1.4x teleconverter I can convert the 135/2 lens into a 189/2.8 lens which covers the medium tele range. Speed is important for taking photos under low light conditions, for night photography, for portrait shots, and for better auto focus (AF) accuracy. More light can get into a fast lens at its widest open aperture still providing a focused image with a shallow depth of field (DoF). A good example is the night shot in Holmdel Park below which was taken without tripod support under very dim light conditions with my 35/1.4 lens at f/1.4.
(c) Weight: This claim really depends. The faster the lens, the more and also bigger glass is built into the lens body which increases the weight. My 24-70/2.8 lens is heavy, but adding the weight of my 35/1.4, 50/1.2, and 85/1.8 lenses, I am nearly at the double of the weight of the zoom lens (950 g for the zoom, 1600 g for the set of primes). So the weight argument is a bit vague here in case somebody wants to cover the range of a zoom lens with several very fast prime lenses. It makes sense on the other hand when comparing two sort of prime lenses with each other - the 50/1.2 weighs 590 g, while the 50/1.4 (one third stop slower) weighs only 290 g. That's why I am keeping the 50/1.4 - ideal to reduce weight if needed and still having a fast lens!
Personally I often mix up both of the worlds - depending on the situation, I sometimes choose my 50/1.2 in combination with my 70-200/4 IS lens. For landscape shots I always take my 17-40/4 and my 24/3.5 T/S lenses accompanied again by my 70-200/4 IS. For far tele ranges I only have a slower zoom lens, the 100-400/4.5-5.6 which was so far always sufficient to me. For close-up and macro studies, I often only take primes like my 100/2.8, 105/2.8, or 65/2.8 macro lenses. I also managed to take fantastic close-ups with my 24-70/2.8 and with my other tele zoom lenses by using extension tubes or a reversed lens setup (this setup will be described in my future macro photography blog). The dragonfly photo below was taken with my 70-200/4 IS lens, 1.4x teleconverter, and 12 mm extension tube.
Overall, there is nothing wrong using a good zoom lens! It provides more flexibility and often reduces weight. For more creative photography, I recommend using prime lenses. Just because the depth of field effects are so much better with fast primes. My photos are taken with a broad mix of different kind of lenses - in the end the final photo and the composition counts, it is the photographer's job to ensure the most is made out of the wanted effect no matter how this task is accomplished. Tools (related to lenses) are not just tools, some can be applied better for one kind of job than others. This makes photography exciting!
Is Faster Better?
Many articles describe the advantages of fast lenses - meant are lenses which have a wide maximum aperture and which let a lot of light in. The wider open the aperture blade, the smaller the f-number. Fast is somehow defined by being at least f-stop f/2.8 or even better with a lower aperture number than this f-stop. For every f-stop faster - full f-stops fastest to slower apertures are f/1.0, f/1.4, f/2.0, f/2.8, f/4.0, f/5.6 - the aperture hole has to double its size for each stop faster. Lenses are defined by their maximum aperture. An example is this: The 35 f/2.0 only allows in half the light of the 35 f/1.4 at its maximum aperture.
Fast lenses need larger glass since it needs to accommodate for the larger maximum aperture hole of the blades. The size of the lens also depends on the focal length - longer focal lengths need larger glass, too. And now we see the two main disadvantages of fast lenses - weight and cost. Larger glass requires larger lens barrels, more difficult optical design, and more sophisticated quality control of the lens parts. Most modern consumer zoom lenses are slower lenses with maximum apertures between f/3.5 and f/5.6. They are light and less bulky - ideal for carry-on luggage and traveling.
But fast lenses have a few unbeatable advantages speaking for themselves: normally lenses are sharpest a few stops beyond the maximum aperture. A 50 f/2.8 would be likely sharpest at f/5.6 or f/8. If we now have a 50 mm lens with a larger maximum aperture of f/1.4 for example, we suddenly reach the peak of lens sharpness already around f/2.8 to f/4.0! This means we can work under much more difficult light conditions with wider open apertures and also achieving the same sharpness!
Faster f-stops allow the photographer to create much more creative photos by making use of the shallow depth of field (DoF) at wide maximum aperture numbers. The DoF at f/1.0 is so shallow that focusing on the right spot gets extremely difficult. Fast apertures are also very demanding for every autofocus (AF) system in cameras since it makes it harder and harder for the electronic focus system to determine the focus spot accurately enough. Microfocus adjustment of lens and camera together is highly recommended here to compensate for tiny camera body and lens variations which can otherwise easily lead to front- or backfocus issues. Unfortunately not every DSLR camera has this option included yet. Beautiful DoF examples can be created with flowers like the one on the left. The center is kept sharp, while the petals become more blurry with a wider aperture which gives the photo some sort of motion effect.
Bigger lenses let a lot more light pass through the sensor and the viewfinder itself! When I bought my first fast lenses, it amazed me how much brighter the view through my fast lens got. Manual focusing was so much easier! Sometimes the light transmission was so good that I had to underexpose my photos with up to -2/3 stops of exposure compensation. My 50 f/1.2 lens - it is the fastest lens which I own so far! - is a good example for this phenomena. Of course this effect is perfect for shooting in dim light conditions or especially in the night. The photo of the shell was taken under a dim light and manual focus with my 50 f/1.4 at f/2.2 without tripod support.
Often forgotten is another quite interesting positive effect of fast lenses - the very smooth bokeh effect. Bokeh derives from the Japanese and stands in photography for an aesthetic quality of blur. This effect is mostly caused by the lens design itself and by the shape of the lens aperture blades. Smaller apertures lead to more unwanted hard-edged bokeh, while fast lenses with wide maximum apertures give desirable smooth bokeh circles. A good example for this effect with a fast lens is one of my Christmas photos below.
I used my 135 f/2.0 lens wide open at f/2.0 for this shot. The out of focus lights appear in circular or oval shapes with no sign of edges which gives a mix of unreal and dreaming effect.
It takes some effort as amateur to vest into a bunch of fast prime lenses. But I guarantee you that you will hold onto them because they enable you to take photos in a way you would not be able to do with slower zoom lenses.
Let's Get Fishy!
This blog gives some insight to one of my most creative lenses on full frame, the 8 mm fisheye lens. 8 mm focal length provides a circular 180 degree image on a full frame sensor. There are a few suppliers which manufacture 8 mm fisheye lenses suitable for full frame sensors. I found the best quality for the bucks can be achieved with the manual Peleng 8 mm f/3.5 lens. Made in the Ukraine, the Peleng lens is not a common lens. It was developed during the Russian space research program to provide superwide 180 degree images of the space. A while ago it was commercialized and also adapted to fit to DSLR cameras. It is a very compact, but heavy lens with one of the best built qualities compared to other lens bodies I have seen so far. Stepped down a bit it provides an excellent center sharpness which is still remarkable at the circular borders on full-frame. The characteristic feature of this lens is its rounded huge front lens without the option to use filters on top of it. A small UV filter is built into the lens body close to the adapter mount. The filter can be removed, but it is recommended to keep it since it is also used as a necessary lens element. When holding the front lens into the light, you will see differently colored reflections on the lens coating depending on the light angle.
It is surprising that I never had to change contrast or saturation of taken RAW photos with this lens - the color reproduction is superb, you might need to underexpose a bit to achieve better contrast especially at wider open apertures.
Main issue of this lens is getting lens flares opposite to the position of the light source. This is nearly unavoidable with such 180 degree field of view. Flares sometimes create additional artistic effects. Best way to remove those flares is to apply a circular crop of the taken photo in post processing. Other 8 mm prime lenses might be better in this regard and not as prone to flaring - but they cost at least more than twice the money and have no full metal lens body!
The lens allows to use apertures between f3.5 and f16 in 6 stops. Best sharpness is achieved at f8-11. Chromatic aberrations are much less than I expected after reading some reviews. In fact my Canon 17-40 mm f4 L lens shows more purple fringing at 17 mm uncorrected than this lens does.
The photo on the left is an ideal situation for making use of the circular 180 degrees - the crosswalk and the architectural design of it shines within this view. Just make sure that your shoes won't be in the photo!
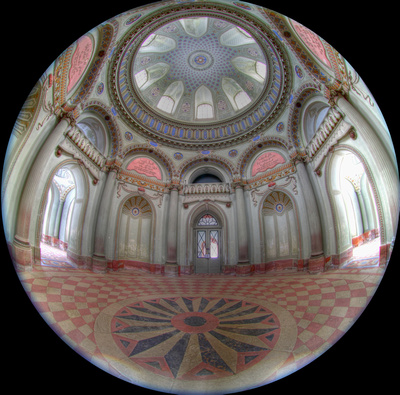
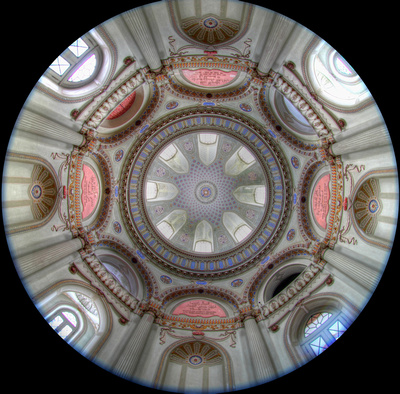
Architecture is one of the best situations where this lens can be used. The photos below were taken inside a mosque which is located inside a castle garden of my hometown in Germany. Both are HDR (high dynamic range) photos to compensate for the bright light coming through the windows and the darker inside of the room leaving the bright colorful wall paintings as seen with your eye. The photo on the left is the central view, while the right photo is directly pointed towards the circular ceiling.

Looking more into creative aspects, the photo on the left shines a different light on a very common object. Can you guess what it is? The circular distortion brings out totally different elements in the perspective view.
Another example is the photo below - as you might have already guessed, it shows the inside of a hot air balloon. At the balloon festival they charged visitors an entrance fee to go inside balloons and to take photos - here I found my Peleng lens to be a useful spy lens! I just needed a brief moment outside at the entrance door to take this photo through the opening - and got at once the whole inside area.
Fisheye shots allow for unusual compositions like the photo of the inside of a wedding pavillion outside. The round roof shape was ideal for the circular field of view at 8 mm full frame. I was lucky enough to get the cloud structure into the center.
If you want a fun lens to do some more creative shots of landscapes and architecture without getting too serious about it, then this is the right lens for you. It is not my most commonly used lens, but there are situations where it is just the best to cover the situation.
Infrared Full Frame
In the past I used my older Rebel XT (EOS 350D) DSLR camera for infrared (IR) photography simply by attaching a 720 nm infrared filter onto the front lens. Main disadvantage with this method are longer exposure times between 5-15 seconds depending on light conditions. Focusing was a bit tricky, too - this camera has no Live View built in, so I had to rely on experience and the red focus mark on the lens. Several photos were needed to get one decent sharp one. I quickly grew out of this bit of cumbersome infrared shooting technique: I no longer wanted to rely on static objects to take infrared photos of; also I found myself limited by the APC-S cropped sensor in the Rebel camera which made it hard to get a wider field of view with my good wide angle lenses.
The anti-alias and the hot mirror filter (AA/ICF) in front of my full frame 5D II camera is very strong - I can confirm posts of disappointed IR photographers who tried the IR filter-on-lens method with this full frame camera. Very long exposure times about 30 seconds are needed, and unfortunately some regular light passes through due to the very long exposure. The IR photo doesn't look right, the white reflective tones are all greyish looking. Post processing can't resolve this either.
Finally in April 2012 I had a second 5D MkII camera body converted to an infrared camera with 715 nm cutoff filter. To do this, the AA/ICF filters in front of the CMOS sensor had to be replaced. The ultrasonic sensor cleaning was disabled, too - the piezo strips of the cleaning device are directly glued on the AA/ICF which had to be removed.
I have used now my IR camera on many occasions, and it is a blast! I am able to create photo compositions which are just impossible to do in regular light or normal B&W photography. Clouds and foliage appear bright and very rich in contrast, while water is mostly pitch black.
This moment on the left photo remained only for less than 2 minutes, and I was fortunate just to have my IR camera with lens ready to take a shot of this scenery! This picture in regular color would look much less impressive.
With a 715 nm cutoff filter, still some light will be able to pass through the sensor. By converting the red/blue color channels in post processing, even some sort of color photos are possible. Personally I like it with blue sky in the background and white foreground as seen in this photo below. Especially green foliage (grass, leaves, plants) looks very vibrant in infrared. The chlorophyll in the plant cells is known to reflect infrared light which is registered by the camera. The more infrared an object reflects, the more brighter it will appear in the photo.
This allows to take very contrast-rich photos which cannot be taken in regular light or the same effects achieved by professional post processing software. My converted IR camera can be used in infrared nearly the same as my regular light camera body. Focusing works the same (it is calibrated after the conversion, but I recommend also using microfocus adjustment for commonly used lenses). Metering is a bit more tricky - it can change severely by just moving the camera from a specific angle to the sun for example. Get used to manual mode or at least under/overexposure settings! +/- 1 to 2 stops exposure compensation settings are totally normal.
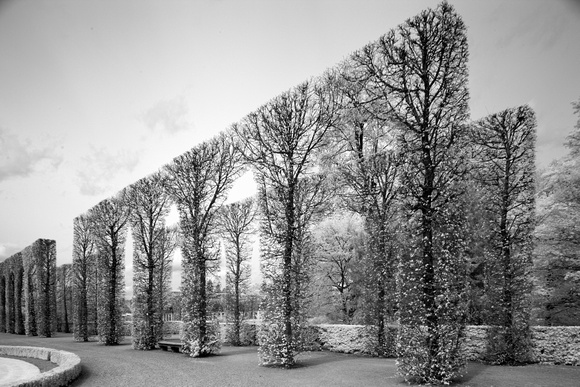
This goes in line with using one of my favorite lenses, the 24 mm f/3.5 tilt/shift lens. I love this lens for architectural and landscape shots since I can avoid distorted lines by shifting and increasing (or decreasing) the depth of field (DoF) by tilting. Now I can use my favorite wide angle lens in infrared, too! The photo below which was taken inside a castle garden could not be accomplished with a regular 24 mm wide angle lens - do you see the straight vertical tree lines? Infrared gives the additional "touch" by showing the young leaves and bushes in a bright contrast to the dark tree stems.
Other than nature, IR photography is a useful tool in the mechanical/technical area. Its better contrast-rich photos bring out details a lot better and appealing. The HDR (high dynamic range) photo below of an opened turbine of a FedEx cargo airplane was taken at 17 mm focal length. Small differences in light give a glow to some tubes and parts, while other structures remain darker.
Last but not least my IR-converted full frame camera allows to take appealing portrait shots! One IR portrait photo of mine can be seen in the "About" section of my website here. Skin looks smoother and more even than in regular light.
Please feel free to check out my infrared photos on my website! They can be found in several galleries, with some of them in the infrared gallery.