Welcome to my Photo Blog!
Kodak Ektachrome 400X (EPL) Film Review in 120 Format
We all heard the news that Kodak Alaris is bringing back Ektrachrome 100 slide film - it is available since last year in 35 mm format and supposed to be produced in 120 film format this year. Much less known is one of the former relatives of this film - the Ektrachrome 400. Other than a few shootout videos taken with expired rolls of this film, there is not much found online about it. In 2013, all available Ektrachrome films were discontinued including the Ektachrome 400. You can still find some expired Ektachrome 400 film online, but supply especially for the medium-format 120 film size is limited and quite expensive for the age of the film. I was lucky that a friend of mine handed me several rolls of well-stored 120-format based Ektrachrome 400X (EPL) film with expiration date 2007 which I could use with my medium format cameras. I shot the first roll of this film with my Hasselblad 500 C/M in 6x6 cm format and developed the exposed film myself with the required E-6 color slide film process. Since there is not much out there describing the main properties of this film, I decided to write this short film review of it.
With regular color negative film, there is the rule of thumb that for every 10 years of storage, the film loses 1 stop of sensitivity when stored well. This rule does not easily apply to color slide (positive) film since overexposure can easily be tolerated by negative film but not by slide film! I decided to be cautious on my first trial run with the Ektrachrome 400 slide film even it was already 12 years old. I didn't want to risk overexposing the film by applying one stop exposure upfront without having tested it first (meaning to use it as an ISO 200 film). I set my Gossen light meter to ISO 400 sensitivity and went from there. As location for testing, I selected Fort Hancock at Sandy Hook/NJ since I am very familiar with this place. It provides good examples for yellowish, greenish, and brown decaying structures in high contrast scenes depending on the light. I chose a sunny day with a bit of overcast in the sky since I wanted to see how the colors would be registered by this film.
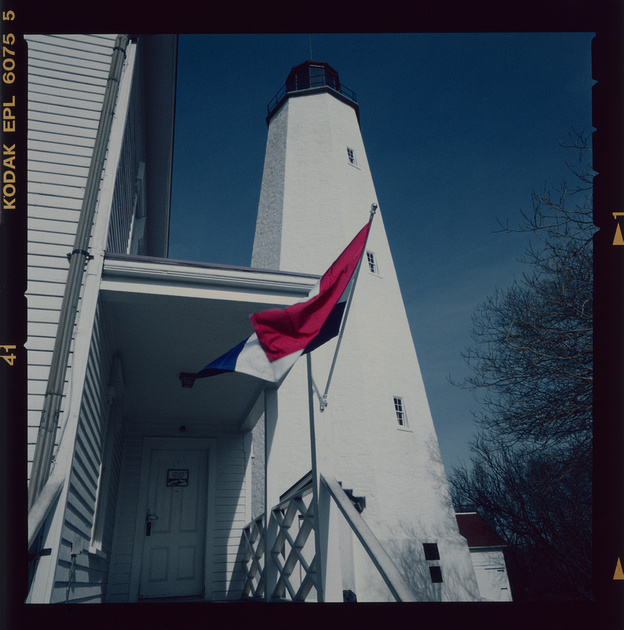
As first frame with this film, I selected the famous lighthouse tower which was recently repainted in a glowing white. Since so much light is reflected from the white paint, I added an additional stop of exposure to the metered value to avoid underexposure in the darker areas. I was afraid that I would still blow out the sky by doing so but simply gave it a try. I used a circular 2-stop ND glass filter to accommodate the limit of 1/500s of the camera and avoiding to close down the lens aperture to the limit. To my surprise, the frame turned out nearly perfect - I could see details in the shadows as well as structure in the white of the tower. This first frame already revealed one main distinguished property of this film - there was no washout of the sky, instead it turned out fully blue like if I had used a polarizer. Some cyan color sneaked into the white of the lighthouse, so I de-saturated a bit the cyan color channel of the scanned positive to make the white look more natural. Shadows still tend to have some blueish cast which reminds me on Kodak Ektar 100 color negative film which does the same. On the other hand, the red turned out darker than expected. The top of the lighthouse tower has a red metal casing which looks black in the positive; also the red in the flag didn't look natural. I increased the saturation of the red channel to compensate - indeed all frames needed to be pushed a bit in saturation for the red color channel. The film reveals some grain if focused closer, but it remains invisible for websize postings. But seeing it already quite well in an enlarged 120 film size, I wonder how worse it would get in the small film format - I suspect it would be too grainy for my taste there.

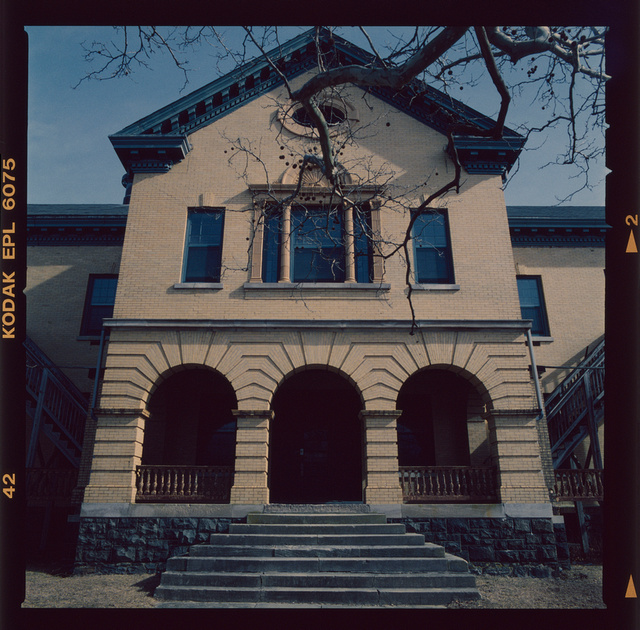
For the second frame, I chose a motive which contained high contrast elements as dark ones behind the staircase, brighter sky on top, and a yellowish tinted wall of the building with wooden stairs in shadow and in the sun on both sides. I know that the dynamic range of slide film is much more limited to negative film, but I wasn't sure how the Ektachrome 400 film would handle it. Similar to the first frame of the lighthouse, I had to decrease saturation of cyan to make the stairs look more grey and increase a bit the saturation of the yellow channel. I left the blue channel unchanged since the sky again turned out perfectly. I personally like the blueish cast within the window glasses, and the bit of blue in the shadow on the left. There is no detail in the dark areas behind - I got the first clue here that maybe a slight overexposure of the film could have been useful. Later frames proved this suspicion.
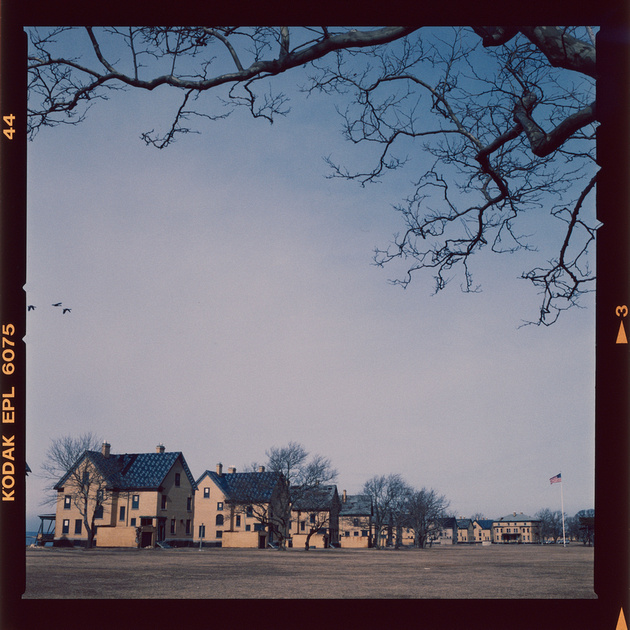
The third frame was predominantly a test how fairly bright (and fairly colorless) sky would turn out. Again I exposed the scene for ISO 400 but had to push the midtones a bit before the final scan after previewing the scanned image. Yellow/orange colors had to be saturated a bit more avoiding that some reddish color cast gets into the brighter elements of the otherwise - again - perfectly lit and colored sky. I could/should have used a graduated ND filter for this scene, but the plastic graduated ND filters which I use often create a magenta color cast which is no issue to remove in a digital photo but certainly is an issue for a film based photo! Since I wanted to see in this trial how the colors turn out on the film itself, I didn't even try to use the filters. As bonus some geese just flew into my photo when i pressed the shutter release button - since I didn't use a filter and therefore used quite a fast exposure time of 1/250s, they showed up very sharp close to the left border.
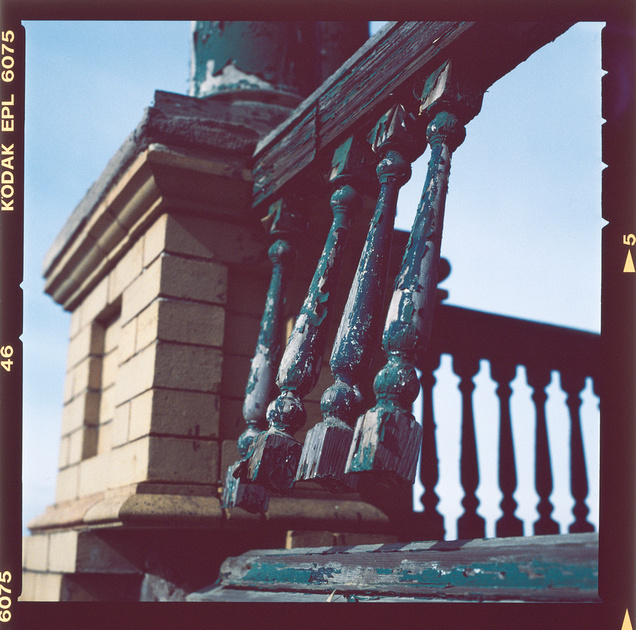
Time to test the film sensitivity of other colors! Some of the decaying structures use green paint - I decided to take a frame with the 80/2.8 lens closer focused in to blur out the background with f/8 and my circular 2-stop glass ND filter. The film revealed a less good sensitivity for greens - they show up in a more blueish look fitting to the dominant color sensitivity of this Ektachrome film. Even seeing the trade-off in the greens, I like that the bright sky in the background still shows some blue in it. Other than increasing again the saturation for yellow as in the frames above and increasing the midtone exposure, I had no other post processing to do here.
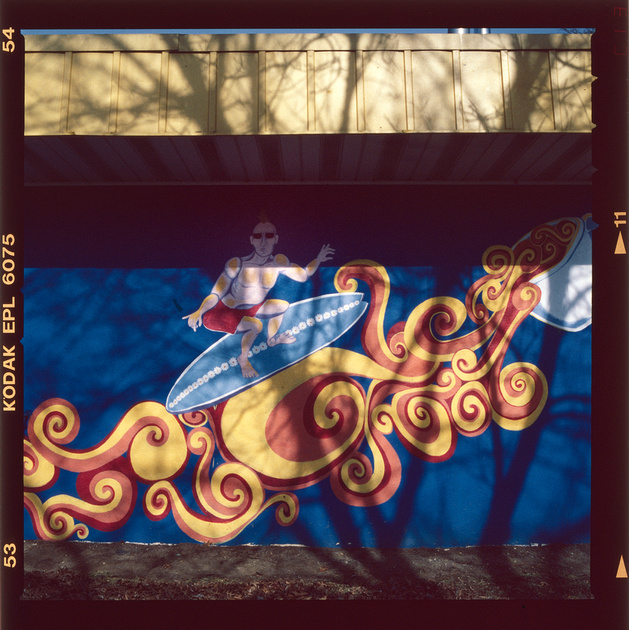
The last frame shown here as example is from a wall drawing which I detected on my drive to Sandy Hook. The blue/yellow/orange colors lit by the sun from the back were the perfect test subject for the Ektachrome 400. Consequently, again the blue dominated the frame followed by the yellow as second. The shadow caused by the overhang has a blueish cast, too.
Overall, a very unique film which doesn't compare easily to any other Fuji slide films I have used earlier! I can't fully exclude that some of the color gamut deviations are partially caused by my own E-6 development, but so far I developed a bunch of other Fuji slide films very well which had a different look than the Ektachrome film. A quick summary of my pros and cons of this film:
PROS:
- Rich in blues, brings out sky rich in color without using additional filters
- Very rich and contrasty look
- High resolution for this mid ISO range film
- Best use for landscape/scenery photography, also architecture
CONS:
- Less sensitive for green, yellow/orange needs to be pushed a bit
- White has a cyan tint in it (can be removed easily in PP)
- Visible grain when zoomed in (not an issue for the 120 film format though but likely for 35 mm film)
- Wouldn't use it as my first choice for portraits
What Is Going On With Photography?!
A bit of an unusual blog post from me since it doesn't cover technical aspects in photography. But I felt the urge to write about a social matter which has increased related to photography. But let me start from the beginning when I started off in photography as teenager in the mid 80s. This was a time long before internet, and if looking for information, we relied on books, journals, and the library to find out more. During this time in the 80s, photography was still a profitable business for professional photographers - in any kind of field. I remember when going on vacation with my parents, that often my Dad and I were the only ones with cameras surrounded by beautiful landscapes - National Parks were much less crowded with visitors, and it actually was no issue at all photographing the scenery without getting people in the frame.
This situation remained about the same even up to 2001, when I last time visited Yosemite National Park with friends of mine (see photos below taken with my SLR at the time in 04/2001). There were more amateur photographers with SLRs and film P&S cameras around, but well dispersed throughout the park. You could enjoy the silence when hiking and taking your time to snap photos. The change started slowly around 2002, when the first digital cameras became available for the amateur - I also got my first digital P&S, the Sony DSC-P5 with at the time unbeatable 3 MP in this category! When going outside on hikes and to take photos, I suddenly saw a few more other amateurs shooting with digital cameras, but it was still sporadic.

I came to the US permanently in 2005, and this was also the year when I upgraded to my first DSLR, the Canon Rebel XT with decent 8 MP APS-C sensor. Before I had stopped taking regular photos with my analog SLR since film development cost and uncertainty in the lab development took the fun away for me. My Sony DSC-P5 did not allow me to use manual modes, it was all P&S only. It worked well, but I was quickly bored by just pressing the shutter release button with this camera or making a quick low res video sequence with it. The Rebel XT brought back the fun for me even I had compared to my current situation a minimal technical photography knowledge since I was never taught in it nor did I read books about it - I just learned from my Dad and shot film with try&error. I remember that I thought in 2005 that I only need one lens for all (why the heck bothering with primes?!) and bought this camera with a Sigma 28-300 super zoom lens. Quickly I had to realize that this lens was not as I expected it to perform especially at the wide and long ends (in fact it turned out to be the worst lens image-quality wise which I ever bought!). I used this lens still for a year - but decided then to make more use of the modernized internet at the time with photo forums and the first photo reviews streaming in. I self-taught myself about lens characteristics, lens speeds, optical properties, etc etc. I bought my first higher quality Canon EF lenses and suddenly even had a lot more fun! GAS (Gear Aquisition Syndrome) was kicking in, and soon I had a nice collection of EF lenses at hand. I really enjoyed digital at this point and remember that I never wanted to go back to film. Year by year starting around 2005, I saw more and more people with digital cameras in the field. I lived in PA at the time, and tried to connect to other amateur photographers in the area. But there was not even one meetup photography group in the whole Philly area nor a photo club to share ideas and do photo shooting in a group. For years I photographed by myself all the time until I joined flickr and found a few photographers in my area to meet up with. Flickr also became the first website to share my photos with others. 2009 was another milestone for me when I was able to afford a full frame (35 mm based) DSLR, the Canon 5D MkII. This camera brought me again to a higher level in my skills using this camera with better viewfinder and finally avoiding the often disliked crop factor since I preferred mostly shooting wide. At the time I was shooting often at Valley Forge National Historic Park, and I could tell from year by year I was shooting there that more amateur photographers started taking photos around me, but it still wasn't too bad regarding crowds. In 2010 I got the opportunity to do my first photo exhibit inside the YMCA in Berwyn/PA - not really knowing how to do this professionally well, I used cheaper glass clip-frames instead of wooden frames. The exhibit was still well received, but this was the time I learned that the location and audience is important when anticipating sales. Most people simply wanted to go to the gym and exercise or bring their kids to classes and were not at all into photography or even considering buying photos (later I learned that the same applies for exhibits in libraries where people might look at the photos but most have no intention at all to make a purchase at this location).
2010 brought big professional changes for me when I changed my workplace and moved from PA to NJ. I would have never thought at the time that this would change my photography severely! In PA I loved going to parks to take scenery, flower, and especially all kind of insect macro shots - I could do this there for hours undisturbed. But NJ was a totally different game - parks there are always crowded in spring to fall, I found it very hard to do macro shots undisturbed by people walking by. But my move had its benefits - people became interested exponentially in digital photography since gear was now a lot more affordable than just 5 years earlier. Photo meetup and photo clubs formed all over the place, and getting to know others with similar interests was easy. I started getting out more, shooting sunrises and all kind of locations in a group of 10-15 people. Everybody knew each other, it was a mixed age range from the 30s to 70s.
But nothing remains the same, change is imminent! What was formerly a nice group of single-minded people became an overcrowded and less personal group only 2 years after I joined. I remember a sunrise shoot where more than 40 people came, and it was tough to have somebody not walking into my frame (or not standing myself in the frame of somebody else). Also the age distribution in the group changed - the younger people disappeared, and suddenly the median was easily over 55 at the time. Nothing against retirees (hey, we all don't get younger), but this is the group from which camera manufacturers must have made a lot of money selling gear! It is caused by a great combination of available time and opportunity to use a technology at its highest for an affordable price. Younger people often are professionally busy, have family commitments, and often less money available to purchase photo gear, too. Also since mid 2007, smartphones were on the rise which came with increasingly better camera technology. Cameras also had quite short innovation cycles - every two years a new camera with new sensor or image improving technology hit the market. Marketing created a hype to upgrade to the best quickly, vest in more modern lenses etc. And people followed - both with smartphones and digital cameras.
And now things turned really crowded. Forget about being contacted by a well known publishing company which saw one of my photos on flickr and asked to purchase it for a book. The values of photos hit the bottom, photo stock markets skyrocketed in profitability by paying the photographer only the absolute minimum and cashing in the rest. After I started using my own photo website and deserting flickr, I was contacted a few times to hand over a few photos for free and just receiving the acknowledgment with my name. When I refused to do this, I got once the response that "everyone can do this photo with the cell anyway". Well, best of luck buddy! But this clearly was a sign of a shift in attitude towards photography which had much more supply than demand. Professional photographers had to close down their business because of amateurs disrupting the prices and profits with often mediocre quality of work done. I remember an article where a professional landscape photographer was asked how he avoids that somebody else takes the same shot. His answer was to use special lens gear which most amateurs can't afford - even this is no longer an obstacle now for most lenses which all got cheaper. Competition between amateurs was also on the rise - facebook became very popular and people posting their taken photos. One way to kick out potential competition was (and still is) to hide the location where the photo was taken. In one example a few years back one amateur photographer even purposely assigned the wrong location to his photo to mislead potential copycats. This all ignores that the value of any kind of photo isn't there anymore monetary-wise in the first place.
What's next? Mirrorless technology is certainly on the rise, but the photo market itself is saturated since all interested ones already upgraded from film to digital camera technology from about 2005 to 2015. Smartphone cameras are so good now that nobody can tell the difference between cell and semi-professional camera from a photo posted on the web. Art galleries ask interested photographers for a hefty fee just to present photo prints for a few weeks in a small gallery section. Rarely anyone actually still buys photos - companies have contracts with photo stock distributors for an annual fee to use any kind of photo they need from the site. Potential customers rather grab their own digital camera (or cell phone) to try to take a similar photo which they see and like in an exhibit than actually paying $$ for it. It has gotten so bad that many started post processing well taken photos into painting look-alikes since this stands out from the mass and actually attracted customers to purchase the modified photo. Others went a step further and sold all their photo gear to do painting rather than photography since this is still seen as form of art.
Especially youngsters who never grew up with analog photography have come back since 2016 to film. Film is again a slowly increasing market after it was considered dead in 2010. Several companies are now revamping their activity to manufacture films which isn't all that easy after equipment was shut down or given to the junkyard about 10 years ago. Analog well maintained camera gear of known brands like Leica, Zeiss, Hasselblad etc easily doubled in the past three years due to high demand. Film will never even get close to the digital photo market in the future - it will remain a niche, but it is again a growing one. Many find themselves more connected with the "real" photography when using film, and I have to agree with this from my experience after I started shooting film again 4 years ago.
It is the best time ever regarding the choices we all have to use photo gear, but it has also become an overcrowded field leading to environmental issues, for example in National Parks where herds of amateur photographers enter every year stumbling on the same location to take similar shots as already seen on facebook or IG. Iceland already took measures and closed districts to photographers for exactly this reason. More often we all see signs with "No Photography Allowed" because it has become just too much. I sometimes ask myself these days if it is really worthwhile going out and shooting instead of doing something else. I most often still answer it with "yes" since I use it as creative outlet, but my expectation has severely changed what I want to do with my photos compared to 10 years ago. Other than for the benefit of social interaction, I don't see any value for me in participating in photo exhibits anymore or trying to sell my photos online.
I am curious what I might write in 10 years from now on this subject. Please leave your comments below! Happy shooting!
Hasselblad 500 C/M vs Mamiya RZ67 Pro
I recently was lucky enough to grab two good deals for great medium-format film cameras and accessories. Earlier in 2018, I bought the Mamiya RZ67 Pro with two lenses - the Mamiya 110/2.8 Sekor Z and 65/4.0 K/L lenses. I purchased a Hasselblad 500 C/M (V Series) later the same year with a Zeiss 2.8/80 Planar T* CF lens, and I added a Zeiss 3.5/60 Distagon T* CF lens.
First a quick summary of my findings where both camera systems have similarities and differences:
| Mamiya RZ67 Pro | Hasselblad 500 C/M |
|---|---|
| Crop factor from 6x7 cm to 35 mm format: 0.50 | Crop factor from 6x6 cm to 35 mm format: 0.55 |
| Heavy and sturdy plastic camera body, very good for studio work | Rigid and well built mostly metal camera body but well portable |
| Battery required, electronic features | Fully mechanical, no battery required |
| Exposure time from B/8 sec to 1/400 sec (on camera exposure wheel) | Exposure time from B/1 sec to 1/500 sec (on lens) |
| 6x7 cm film back which can be rotated for portrait or landscape | 6x6 or 4x4 film backs, square format (exemption is a rare optional 4.5x6 portrait/vertical film back) |
| Lens focus system is in the camera allowing close focus distance | Focus is in the lens, minimum focus distance is 0.6-0.9 meters |
| Lenses are a bulkier with leaf shutter in lens | More compact but heavier lenses, leaf shutter in lens |
| Backwards compatibility lens system with limitations (shutter speed) | Fully backwards compatible lens and accessory system |
| Light metering possible with optional prism viewfinder | Light metering possible with expensive electronic prism viewfinders |
| Automatic film winding with optional RZ winder (heavy with batteries) | Manual film winding only |
| Standard 120 film backs for 6x7, 6x6 backs are very expensive | Big variety of A12 (6x6), A16 (4x4 or 4.5x6), and A24 (6x6) film backs |
| Multi-exposure by simply flipping M/R switch on the camera | More cumbersome way to handle multi-exposure, no direct function |
| Prism viewfinder with electronic metering available (has to fit the specific camera model) | Large variety of older and newer prism viewfinders with and w/o electronics, pricey |
| Mirror flips up after cable release is mounted onto lens port and shutter release button is pressed on the camera | Designated mirror up lever for long exposures |
| Camera price with 120 film back and 110/2.8 lens: used approx. $600 | Camera price with A12 (120 film) back and 2.8/80 lens: used approx. $1200 |
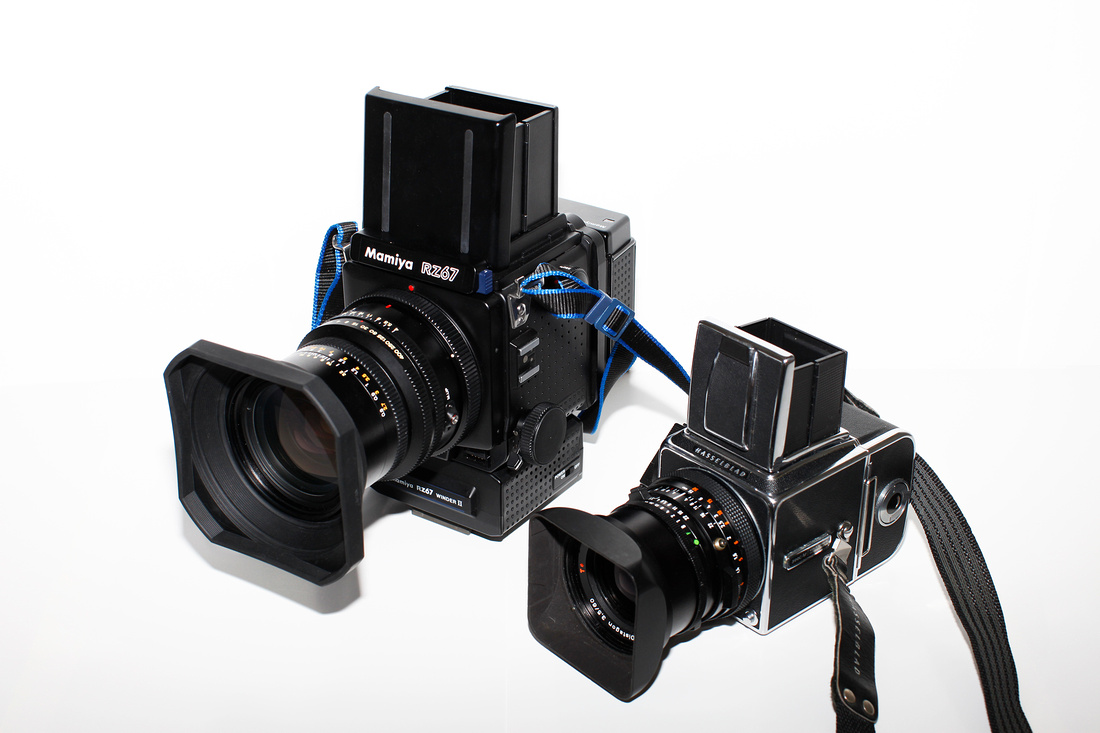
Size comparison between Mamiya RZ67 Pro and Hasselblad 500 C/M with vertical viewfinders. The Mamiya RZ67 Pro has the optional automatic film winder II attached
Which Camera for Which Purpose?
I used both camera systems outdoors for shooting, and carrying the Mamiya RZ67 Pro around for a full day will be quite an exercise. This camera is not made for being moved around and rather serves its purpose as a studio or tripod based camera. The rigid and heavy Mamiya camera body might lead to less vibration issues fixed on a tripod, too. In a studio, the Mamiya can be advantageous over Hasselblad due to its shorter minimum focus distance better suited for portraits and head shots. Since Mamiya lenses have no focus ring capability, and the focusing is all done with a bellow within the camera housing, a much closer focus distance can be achieved. The Hasselblad 500 C/M is a much better choice when you want to be flexible and shooting without tripod. Regarding framing, the Hasselblad will allow you to compose with a square format (6x6 cm as standard) wheras the Mamiya RZ67 Pro generally shoots with 6x7 cm (the standard film back for this camera).
How Do You Mount or Carry Each Camera?
Both cameras can be mounted directly on the camera's base plate onto a tripod head plate. I prefer to use the standard Manfrotto tripod head plate with 1/4" screw mount. The Hasselblad 500 C/M requires - similar to my Leica M3 - a tripod mount reducer bushing from 3/8" to 1/4". Gladly I got a whole set of the bushings when I needed one for my Leica M3 which now helped me to fit a second one for the 500 C/M. The RZ67 Pro body fits directly the 1/4" screw. One difference I observed is that the much heavier RZ67 Pro is ironically better balanced with the neck strap - a lens can be changed much more easily in this position. The Hasselblad flips vertically over after a lens is detached with the lens mount pointing downwards. It doesn't make the lens change unsafe, but it is something to get used to with the 500 C/M. Talking about camera straps - I cursed several times the designer of this Hasselblad camera strap. Mounting and removing the strap with the metal locking plate mechanism is no fun and forced me several times to review the few sentences written about doing this correctly in the manual. If you are not careful, the strap slides and might scratch something on the camera. I highly recommend to attach the Hasselblad camera strap only once and leave it there (make sure it is winded correctly!). The position of the strap unfortunately is not ideal either on the 500 C/M due to its full 360 degree rotation capability - it easily gets in its way with the shutter cocking knob on one side and with sliding in and out the dark slide of the film back on the other side. The Mamiya strap is fixed in a vertical position on the camera which avoids this inconvenience.
Talking About Film Backs and Film Formats...
Loading 120 or 220 film takes a few more precautions with the Hasselblad system: After the roll of new film is inserted, make sure to open the film plane fixing mechanism via clamp first and slide the film underneath of it before rolling the beginning of the film into the inserting spool. After the film is inserted into this spool close the film clamp again. The Mamiya film loading system is more straight forward here and doesn't use this additional film clamp. I never had the impression that a film inserted in the Mamiya film back was less evenly aligned than in the Hasselblad system. Trying to shoot directly in square 6x6 format with the RZ67 Pro is a challenge - used 6x6 Mamiya film backs are extraordinarily expensive online. Better way is to crop in post processing from the 6x7 format after scanning or cut one centimeter off from the frame in the enlarger for darkroom printing. The Mamiya viewfinder has little ear marks to allow composing in 6x6 format, too. The Hasselblad system has a lot more choices when it comes to film backs - there are multiple release versions which can all still be used on the 500 C/M. A very good overview of Hasselblad film backs is shown here:
If you still have some 220 film sitting around, the Hasselblad system is the way now to shoot with it. I found an A24 (cartridges for 220 film have the A24 classification for 24 frames - twice as many as with 120 film) cartridge in good condition online for $40. Keep in mind that 220 film does not use the additional paper backing layer of 120 film which makes the film plane of 220 film thinner. Therefore the film cassettes are rarely interchangeable between 220 and 120 films - a few Hasselblad film backs allow to do this, but certainly none from Mamiya. General rule of thumb for Hasselblad film backs is the newer the better. Often the dark slide is scratched or has bents with the risk of failing winding mechanism in older cartridges offered for sale. Check online on websites the serial# of cartridges to determine their manufacturing date. A16 Hasselblad 120 film backs for 4x4 cm format go for approx. $70 in good condition whereas newer standard A12 ones for 120 film cost more than twice as much used. Also make sure that the cassette serial number (the newer ones only show the last few digits) matches the serial number of the film back - the backs can have quite a bit of variability in the construction - best image quality projected on the film is achieved by matching cassette and film back.

Film backs for the Hasselblad V-series, from left to right: A12 with Lindahl dark slide holder, standard A12 back, A16 back for 4x4 frame format, and A24 designated for 220 film with 24 frames
Another a bit unfortunate mechanical construction is the design of the dark slide in Hasselblad film backs - the end with the lever is a bit protruded to one side. It is not easy to see which side is which especially during shooting - it only becomes a potential issue when removing the film cassette from the inside. If the protruded dark slide lever is pointing towards the film back, it will be automatically moved outside when the film cassette is removed. This is not a big deal, but not as convenient as with the Mamiya film backs where this is never an issue.
Hasselblad was a bit cheap when it comes to storing the dark slide during shooting. Some film backs have an added Lindahl-fabricated dark slide holder on the back which can be quite useful to have. All Mamiya film backs have as standard a plastic dark slide holder on the back.
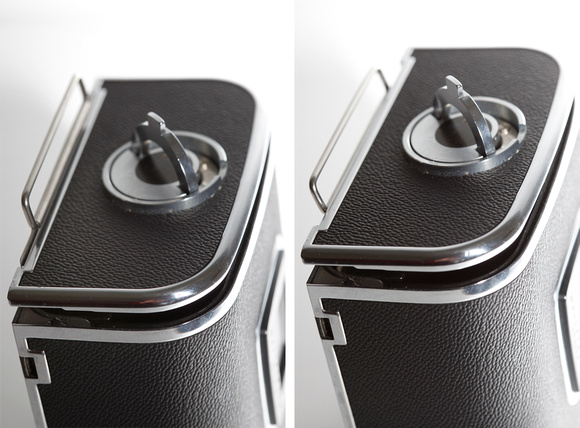
Careful how the dark slide is inserted into a Hasselblad film back - if the bit protruding lever element is pointing towards the side of the film cartridge lid, it will be pushed out with the lid when opened (left photo). If the lever element points to the other side, it will stay in place when the lid is opened (right photo)
Taking photos in square format is something to get used to. Coming from 35 mm film, I am more used to the rectangular format. I enjoy 6x7 with the Mamiya RZ67 Pro camera, but I admit that I now like 6x6 with the Hasselblad even better. The focus on a specific object in a 6x6 frame is more emphasized than in a similar rectangular shot. Big advantage for 6x6 is the avoidance of landscape or portrait framing - you never have to flip the camera or a camera back. Another positive of shooting 6x6 film is that 12 frames fit on one roll of 120 film instead of 10 frames in 6x7. I also tried shooting 4x4 with the A16 Hasselblad film back (giving 16 frames on one 120 film), but the compromise in resolution is visible compared to 6x6. Composition is more cumbersome in 4x4 since a crop factor of 1.5x is applied. IMO it is still a good solution if you are short on a specific film, or avoid changing film too quickly.
Nice feature of the RZ67 Pro is its ability to do multi-exposure shooting by flipping a switch on the camera side. This decouples the film transport mechanism and allows infinite exposures on the same frame. The Hasselblad system also allows doing it, but it is a bit more cumbersome: The film back has to be removed before the shutter is cocked, then the film back is attached and ready for the next shot on the same frame after the dark slide is removed.
It's All About the Lenses!
Nothing beats Zeiss lenses made at the time when the 500 C/M was manufactured in built quality and the lenses I have are superb in sharpness. Since the manual focus system is located within the Zeiss-Hasselblad lens, it potentially can be used adapted on any modern digital mirrorless camera (MLC). Mamiya lenses are only one third of the price compared to the Zeiss-Hasselblad medium-format lenses, but they don't have any focus capability within the lens. Beginners might be confused by looking at a Mamiya medium-format lens which has a look-alike focus ring which only uses a scale to estimate hyperfocal distance depending on aperture setting. It does not have any mechanical function!
Usage of Mamiya medium format lenses is limited to the Mamiya cameras (if no adapter with additional focus feature on a is used adapted to a MLC). Mamiya lenses therefore can't be used on a Hasselblad system. This might make reselling these kind of Mamiya lenses a bit more difficult.
A disadvantage of the Hasselblad-Zeiss lenses is their lack of a standard filter ring thread. Instead the Zeiss lenses use a lock-in system (named with a B** (** = 60 for the Zeiss lenses I use) to attach the lens hood outside the lens barrel, and the fitting lens cap mounted directly onto the bayonet (here it is an advantage to have the bayonet - lens caps sit much better than with any other lens system I know). To use a regular 77 mm diameter filter, you need to purchase a cheap step-up ring (B60-77 mm). I can't use the designated Zeiss lens hood anymore when the step-up ring is attached. Mamiya lenses are much more comfortable here - they use a standard 77 mm filter thread. No issue to use lens hoods with Mamiya lenses since the fitting filters are directly mounted to the lens.
Mamiya allows to use lenses made for the RB67 camera also on the RZ67 cameras. Unfortunately, the lens design was changed quite a bit between these camera versions: when attaching RB-camera based lenses (named K/L lenses) on a newer RZ67 Pro, keep in mind that the exposure setting knob on the camera is overruled by the exposure ring on the K/L lens. You can easily make the mistake and expose like usual with the camera knob and realize later after developing the film that most frames are either under- or overexposed because you shot everything at the same exposure selected on the K/L lens ring. This is because the older K/L lenses lack electronic communication with the camera. Otherwise K/L lenses are cheaper than the more modern Mamiya Z Sekor lenses, but there is another culprit to be aware of when it comes to long exposure shooting. Two remote cables are needed to accomplish this with K/L lenses: one has to be inserted into the lens body to open the lens leaf shutter after the shutter release button is pressed to lift the mirror up (M.UP insert), the other cable in the "B" insert closes the lens' leaf shutter after a given time. Tricky part is when the cable controlling the lens leaf shutter is removed - you have to remind yourself to triple-check (!) that the tiny screw-in M.UP thread on the lens body is fully immersed with the red ring NOT being visible around it. If this element remains protruded (meaning the red ring is visible!), the whole leaf shutter mechanism will be messed up in future exposures - the lens shutter will remain closed and you get unexposed frames! In this case re-insert the cable release and remove it again afterwards to have the screw retracted inside the lens body. Both culprits happened to me when I first used my K/L lens with the RZ67 Pro body - this is the reason why some recommend not to use K/L lenses on newer electronically controlled Mamiya bodies. But keeping the potential obstacles with K/L lenses in mind, they are often an excellent deal out there with very good image quality quite similar to the newer Z lenses. I have not yet tested the Hasselblad system and lenses for long exposure capability! I will update this section after I have tested it.
 Tricky culprit with Mamiya K/L lenses when doing long exposure photography: make absolutely sure that the M.UP screw is pushed back into the lens housing after removing the shutter release. For normal shooting, the red ring should not be visible as shown in the left image.
The Zeiss-Hasselblad lenses use a nice feature on the exposure scale on each lens - the EV number is printed in orange and can be directly copied from the EV number shown in an external light meter. This works well in theory, but is not so practical in reality - the orange EV mark is in 3 o'clock position from the 12 o'clock distance meter mark on top of the lens. I found it very cumbersome to look on the side of the lens to find the EV mark especially when the camera is not mounted on a tripod and hanging from my neck. It is easier to translate the shown light meter based EV number into the corresponding aperture/exposure time equivalent and directly set it this way on top of the lens.
The Zeiss lenses allow to merge otherwise independently rotating aperture and exposure rings - a feature I very rarely use, but it can be helpful when for example the same scene needs to be photographed in a range of different aperture settings. Automatically the exposure time is aligned with each chosen aperture which saves time. Mamiya lenses have neither of these features (which IMO is not a big loss at all).
One thing I found a bit cumbersome on the Zeiss T* CF lenses is the depth of field lever. By moving it into position, the lens aperture will remain at the given aperture setting and allowing a more realistic image view through the viewfinder of the applied depth of field. If you forget to move it back into the open aperture position, you might wonder about a too dark image at closed aperture in the next frames of shooting. Unfortunately this lever can easily be stuck on my Zeiss 2.8/80 Planar lens - therefore I rarely ever use this feature and leave the lever alone.
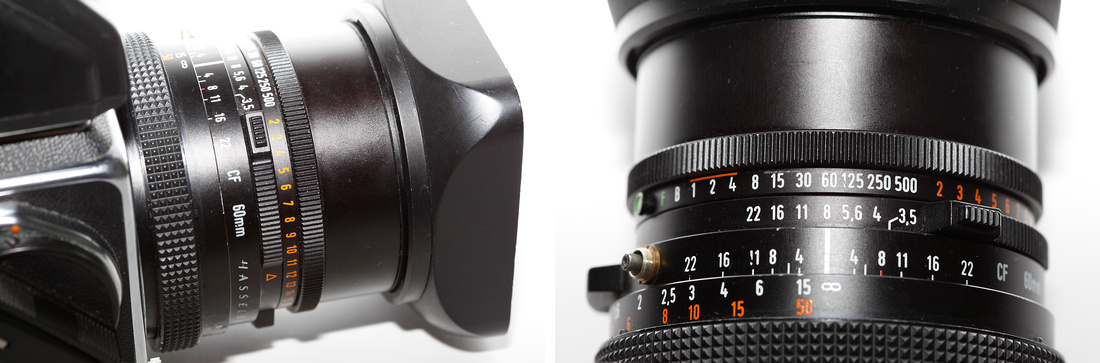 The orange EV scale mark is on the side of the Hasselblad-Zeiss lens bodies - unfortunately not a good position to select this number when the camera isn't used on a tripod (left photo). Aperture and exposure times can be chosen separately or rotated together (right photo).
Achieving Focus
Hasselblad follows the traditional way of focusing with the camera: through the lens by turning the focus ring. The Zeiss-Hasselblad lens focus ring is located at the lower end of the lens barrel - opposite how it is done with DSLR lenses from big brands like Canon or Nikon where the focus ring sits on top of the lens barrel. The focus ring of the Zeiss lenses which I am using is fairly slim for the size of the lens. The manual focus on the Zeiss CF lenses is very precise, but it is not a fast focus system either. Especially when I want to focus from an infinity stop to a close-up distance, it requires a few turns on the focus ring to get there. Mamiya has the focus system built into the camera housing itself: A small bellow moves the attached lens back or forward to achieve focus. I found this system much faster to change the focus point. Problem here is that the RZ67 Pro has no fine adjustment wheel at the focus button (the RZ67 Pro II does), so I need to be very careful how much I turn the wheel to nail the focus within the viewfinder. A small extension or contraction of the bellow makes a big difference in lens focus! I am so far fine with either system to focus accurately, but I simply prefer lenses with focus ring.
About Viewfinders
Both camera systems come as standard with a vertical viewfinder. It is something to get used to especially since left and right of the frame are reversed by looking onto the matt glass due to the mirror underneath. The matt glass of the Hasselblad 500 C/M can be changed - there is a variety of options available, for example with or without grid lines.
For accurate focusing at more shallow depth of field the vertical viewfinder is not the most convenient even if the loupe element is used. When the Mamiya film back is rotated, the vertical viewfinder view changes accordingly depending on landscape or portrait position. To achieve accurate focus, the loupe has to be used - feasible and decent solution, but it requires time to flip out the loupe, focus, and then push it back in. A better option to allow more precise and faster focusing is with a 45 degree prism viewfinder which provides a direct view through the lens without mirror effects.
The Hasselblad system allows to adapt all kind of newer or older prism viewfinders; Mamiya also has some for their cameras. I decided to buy a mint used PM-45 viewfinder for the 500 C/M which has the big advantage that the ocular can be rotated to fit the eyesight diopters. Otherwise additional expensive glass inlays have to be used! The prism viewfinder allows to use the camera like a SLR and shooting from eye-level (while you shoot from your belly level with the vertical viewfinder). Biggest con for a prism viewfinder is its price for the Hasselblad system - the PM-45 goes for about $400 (if you are lucky!). But IMO it is a worthwhile investment which pays off in the long term - I would say it is nearly a must-have for portrait shooting. One minor disadvantage of the PM-45 I have observed recently in cold weather - the ocular lens tends to fog easily, so always have a fiber ready to wipe away the condensed water droplets! You can get more sophisticated (and even more expensive) prism viewfinders with electronic metering, too. I decided against additional electronics since it is another feature which might break especially when the viewfinder is an used one. Instead I prefer to use external metering with a handheld meter.
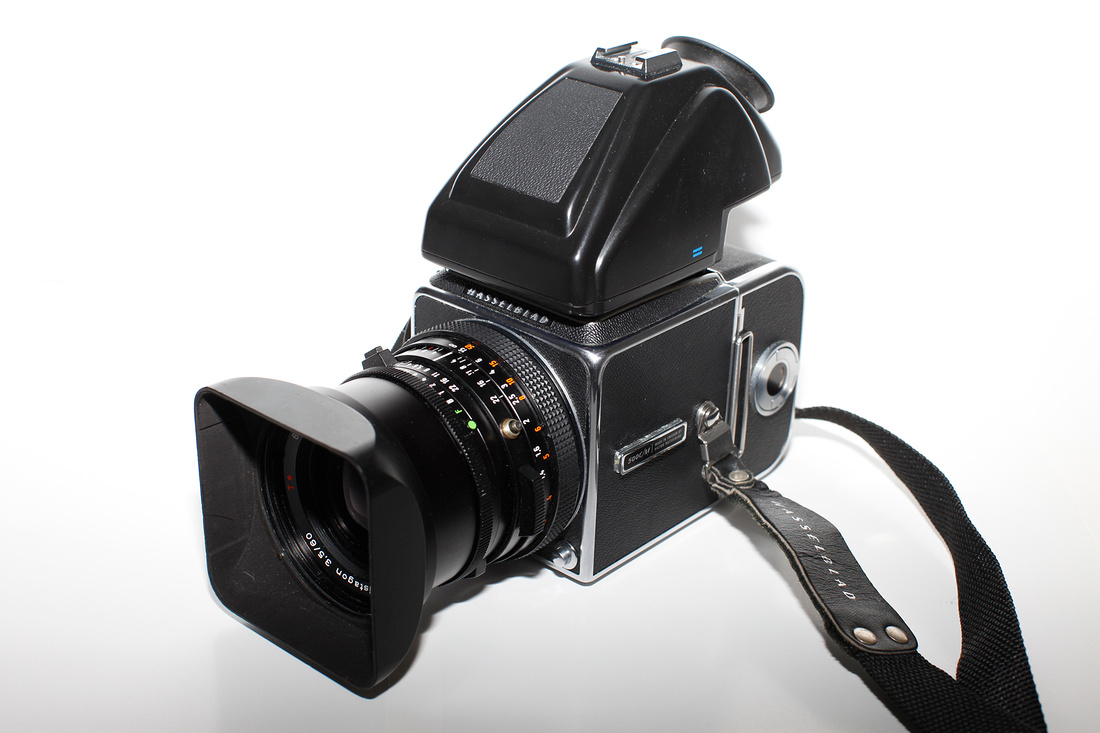
PM-45 prism viewfinder attached to the 500 C/M camera. The matt glass remains in place when the vertical viewfinder is interchanged with the prism viewfinder
Link to Hasselblad Prism Viewfinders
So far I have no personal experience with Mamiya prism viewfinders.
Mirror Up!
Since both cameras have a quite big mirror inside which flips before an exposure is taken, vibration can be an issue especially when shooting at slower shutter times. The Hasselblad 500 C/M has a lever underneath the film winder button which flips the mirror when pressed upwards before the leaf shutter is opened. This avoids getting a blurry image due to vibrations by the flipping mirror. Disadvantage of this method is that you can't see the frame through the viewfinder after the mirror is flipped - this method should be only used when the camera is mounted on a tripod. I tried it a few times handheld, but it is very challenging to maintain the composition in the image frame before and after flipping the mirror and then taking the exposure.
The Mamiya RZ67 Pro can also have the mirror flipped up before an exposure is taken. But the camera has not a designated button or lever to flip the mirror up - instead you have to first attach a cable release into the long exposure lens port, then press the shutter release button of the camera which will flip the mirror up and open the camera back shutter. By pressing the cable release and holding it in open position for a given time, the exposure is taken without the mirror causing vibrations.
Medium Format Film Development
One remark in regard to developing 6x6 or 6x7 films. High micro contrast developers (e. g. Rodinal) are not necessary for this size of B&W negative since the resolution and detail in this size is already so superb that increased edge sharpness is not needed. I prefer a low contrast developer like Xtol in 1:1 dilution which also suppresses strong grain formation. A low speed film like PanF+ 125 gets a digital medium-format look with beautiful grey tones using this developer.
I am using Paterson development tanks with adjustable film reels good for 35 mm, 4.5x6, and 6x6 or 6x7 cm film sizes. I use nitrile gloves when removing the 120 film from its paper backing and cutting the adhesive end. Then I insert it into the plastic reel - but instead of using the back and forward movement with the reel bearings, I simply push with my fingers the film further inside the reel. 120 (or 220) films have no notches which makes this easy. I found this the best way to avoid bending the film or getting the film off track.
Can I Shoot with a Digital Back?
Something I didn't test yet but watched videos about is adaptation of both camera systems with pricey digital backs. In Mamiya's case, only the RZ series can do this; it is said that the RZ67 Pro II is even better suited here due to improved electronic couplings with the digital back. A specific additional adapter set is needed to mount a digital back on a Mamiya RZ67-based camera. All Hasselblad cameras can be equipped in theory with digital backs since the digital device only needs to act as recorder of the captured image but has no control over the otherwise fully mechanical camera and lens parts (which is not so simple with the Mamiya). No additional adapter is needed for the Hassy - the film back is simply replaced by the digital back. But keep in mind that we are not there yet to shoot 6x6 or 6x7 digitally - the largest digital sensor close to 4.5x6 cm size was just announced by Phase 1. Any kind of digital back will have a smaller image frame than film based medium format - it comes with a crop factor and change in the field of view. Instead I recommend to shoot film and simply digitize the developed frame with a good flatbed scanner (for example the Epson V850 or predecessor series).
Where Does This Leave Us?
Which is the more fun system to shoot with? I would answer it is the Hasselblad system. The more bulky Mamiya camera system is a hybrid of traditional medium-format technology with added electronic features which can be sometimes confusing how they play with each other (or not). I personally really like that the Hasselblad 500 C/M is a fully mechanical one - maybe a more fair comparison would be versus the Mamiya RB67 which is also fully manual. If cost is an issue, the Mamiya cameras and lenses are the way to go - the cost only about 30-50% of similar Hasselblad prices with used gear. The Mamiya cameras also give you best flexibility in the medium format size - from rectangular to square (see above regarding PP crop). Hasselblad medium format cameras are focused on square frame formats. At this point I wouldn't separate myself from any system described here - they both complement each other in functionality. Both are capable to capture fantastic photos!
Leica M3
In the past few years I explored Leica M rangefinder film cameras, but most recently I was able to get hold on an excellent looking double-stroke Leica M3 produced in 1957. It came with the original Leica light meter MR which sits on the hotshoe connected to the exposure dial of the camera. Unfortunately both camera and light meter were starting to malfunction shortly after I bought the combo. The light meter was not working reliable at all, and also a change of the meter's battery did not help either. I opened up the MR device after finding online a description how to clean the contacts, reassembled it - with the same unreliable result. My recommendation: don't bother with it, not worth to have it fixed either. In fact I found a much better use of the hotshoe position by using an external viewfinder for my 35 mm lens which I describe in detail below (the M3 has no 35 mm frame lines - the successor model, the M2, does - and yes, the M3 is older than the M2!).
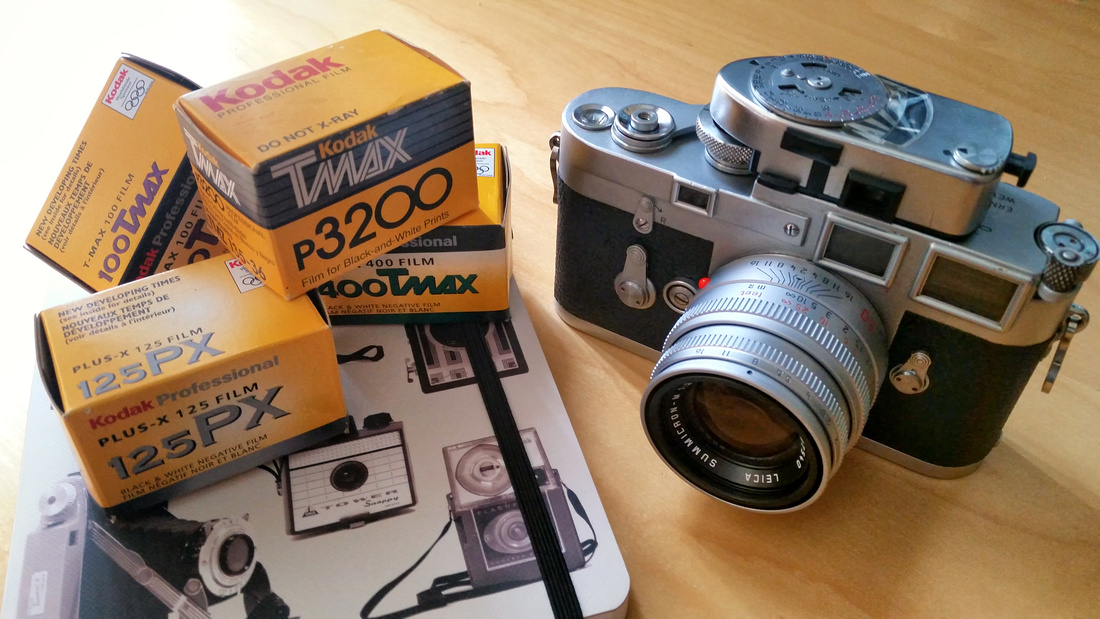
Leica M3 with original Leica Light Meter MR
The Camera Body
The camera body is simply to fall in love with - rigid hard metal base in brass chrome with a good weight. I don't want to ever experience it, but I am quite certain that this camera can drop on solid ground from a handheld position without suffering damage of the body itself. Beautiful also the nicely engraved Leica name on top of the camera which I like much better than the much more attention grabbing Leica red dot on the front in later models. The camera sits very stable on a flat surface with chrome 50/2 lens attached. The center of gravity is on the camera housing and not moved towards the lens! The eyepiece of the viewfinder has no rubber gasket to protect eyeglasses from scratches caused by the metal ring. No biggie for me at the moment since I don't wear glasses while shooting, but I can see this is an issue for other fellows. On the back the camera has two flash synchronization cable sockets for electronic flash and flash bulbs. The latter ones are probably not in use anymore. So far I also never used any electronic flash with this camera either. The film indicator on the back plate is fairly useless IMO but nice to look at. It allows to select the ISO/ASA speed of the inserted film but has no function within the camera itself. It is just a reminder which kind of film speed is used.
The M3 also came in "trim" versions depending on its manufacturing date. Biggest difference between versions is double-stroke (DS) or single-stroke (SS) advance lever. Which one is better? I am pretty undecided about this since all my other film cameras have a single-stroke lever. But I was surprised how quickly I got used to the double-stroke lever. You need to twist the right hand thumb less with each stroke compared to a single-stroke lever (which turns further). I would not make DS or SS as selection criteria for a used M3 camera - both do the same job. Leica later abandoned the DS advance lever which might make a DS based M3 a bit more "unique" and vintage.
This feature might not be often used with Leica Ms, but I really like that the M3 has a shutter self-time release which was unfortunately abandoned by Leica in later models. It's a nice feature and comes handy for group shots where the photographer wants to be included. The shutter click is very silent. Compared to the shutter of my M6 - which I already consider silent - the M3 shutter is even less noisy.
One bad surprise with the M3 was once for me its a bit unusual tripod bushing - it does not fit to the more common 1/4" but is instead made for 3/8" bolts. You need a tripod reducer bushing - good to be aware of this before planning to shoot a sunrise or a sunset with the M3!
The M3 has no light meter within the camera - something seemingly backwards when using this camera in the digital age. You can fully ignore any kind of metering and estimate exposure by following the sunny f/16 rule. I personally find the latter a bit too uncertain since the sunny f/16 rule depends also on the latitude location - in more northern zones it is more like a f/11 sunny rule. With changing weather conditions (sunny/cloudy sky etc) it gets quite tricky sometimes using this rule, especially when taking photos of high contrast scenes. But there is a simple and nearly as convenient workaround - use a free light meter cellphone app. Some apps even distinguish between reflective and indirect lighting by using either the back or the front camera of the cellphone. I found that my light meter cellphone app - I am mostly using an app named LightMeter on my Android phone - is nearly as accurate as my Gossen light meter - instead of carrying cellphone and external Gossen meter, I now only use my cellphone app. In its reflective mode, it also allows some sort of spot metering which works well.
After I shot two films with my M3, suddenly the winder and the shutter were stuck. I read that this is quite common with older Leica rangefinder cameras which haven't been used for a while. Unfortunately, there is no easy homemade fix for that issue: You have to send the camera for a CLA which stands for Cleaning-Lubrication-Adjustment. The US-based Leica repair service in NJ never even replied to my inquiry if this camera could be fixed and how long it would take. Best solution is to contact one of the few independent Leica specialists which you can find online instead which are also very price-competitive and more responsive. My M3 was fixed in less than two weeks, only lubrication and readjustments of shutter speeds were needed as well as cleaning of the rangefinder system. It is working perfectly since!
How To Insert Film
The film insertion into the M3 might appear a bit sketchy in the beginning. The take-up spool is removable - make sure that it the spool is included when you intend to buy a M3! It is an essential part - in case it is missing, you can't insert any film in the camera. To use film, you have to remove this spool from within the right side of the camera after opening the base plate. Then you insert the beginning of the film into a thin slot within the spool. If done right, a dotted arrow will show up against the inserted greyish beginning of the film. Now both film cartridge on the left and take-up spool on the right are inserted into the camera. I find this the most tricky part since the spool has to click into place, but most often the film is not horizontally aligned yet behind the shutter. You might have to move the spool or the film cartridge winders a bit that the beginning of the film aligns with the gear rim of the transport spool which sits next to the inserted take-up spool. Or in other words: the lobes of the gear rim have to grab into the film sprocket. If this isn't done right, the film won't move! After you close the flap and adjust the base plate, take two shots and make sure that the two-dotted rewind knob turns every time you use the advance lever to transport the film. Then you are good to go! Removal of the take-up spool resets the frame counter of the camera to zero.
Rangefinder System and Viewfinder
The Leica M3 is considered to have the best rangefinder system of all Leica Ms even to this date. My experience with the M3 confirms this. The viewfinder is larger than on later M series cameras, and it comes with a bigger magnification finder of 0.92x (standard is now 0.72x and largest size offered is 0.85x). This is especially useful for 50 mm and longer focal lengths of 90 and 135 mm where this camera really shines with. To focus my 90/2.8 M-lens on my M6 is much harder due to the much smaller finder view than with my M3. Another benefit of the M3: no rangefinder patch flaring which appears sometimes in later models as seen in the M6. The M3 viewfinder has a bit of a bluish tint by looking through which does not matter at all. Later M series models like my M6 don't have this tint anymore.
The most frustrating to me is the lack of 35 mm frame lines - especially since 35 mm is my go-to focal length normally. Yes, probably the M2 would have been a better choice here, but simply this M3 worked out for me in a decent deal. Work-around is to use an external viewfinder which I mentioned in the first paragraph, but most of them - even used - are very pricey. I didn't want to vest more than $150-200 for this kind of viewfinder when my M6 already included frame lines for 35 mm lenses. After a bit of searching and waiting, I came across a good deal for a Braun Paxette 38 mm viewfinder in chrome - which fits perfectly on the camera's hotshoe and in its color. The 3 mm focal length difference is small enough that adjusting a composition with the Paxette viewfinder doesn't make a big difference compared to the final 35 mm lens-based photo. Best is that I was able to get it in excellent condition for its age for about $25.
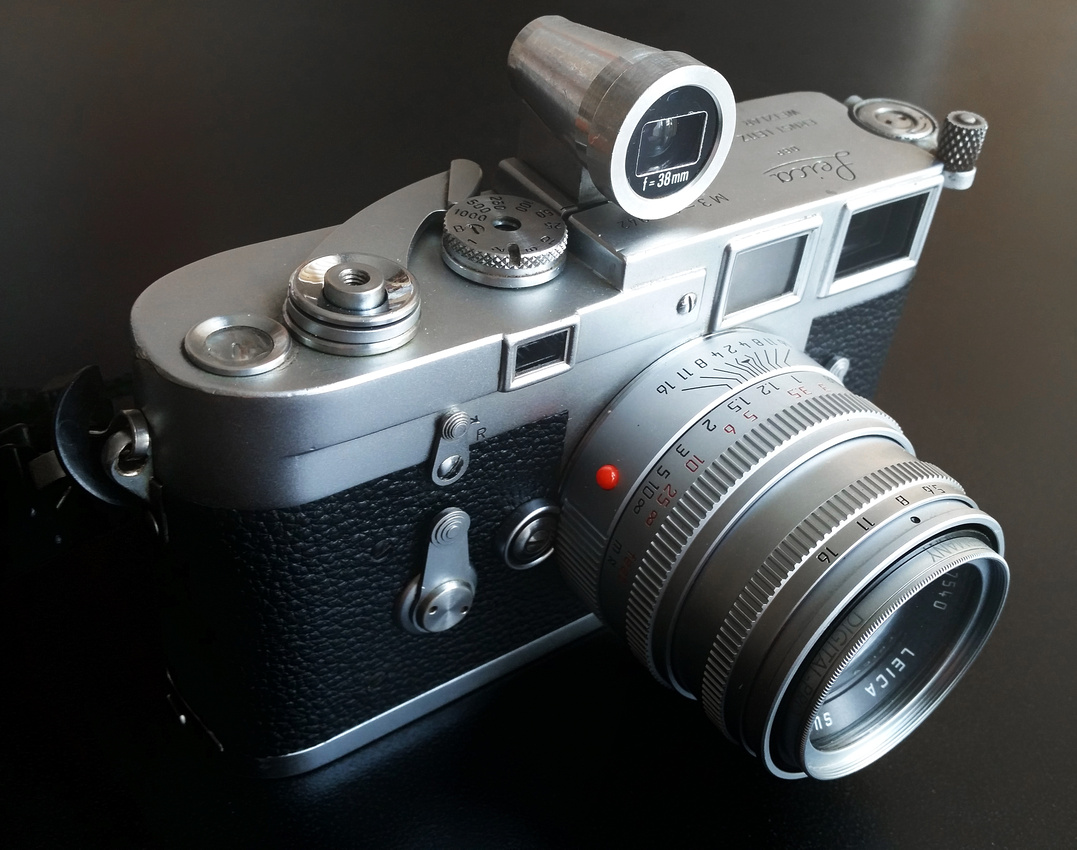
Leica M3 with Braun Paxette 38 mm External Viewfinder
The M3 also requires a pretty good estimate which film ISO to use for an upcoming shooting. You never want to be stuck with a slow film ISO at 100 or below if there is no sun or it is getting slightly dark outside - especially if the camera is handheld. With fast film speeds more modern Leica film Ms also only can go up to 1/1000 seconds same as the M3. With an ISO 400 and a fast lens open at f/2 to allow some shallow depth of field, you might exceed the 1/1000 sec on a sunny day easily. Only way out then is to use a neutral density (ND) filter. I find myself most often using an ISO 125 film which I can push to ISO 200. With a f/2 lens, this allows me to shoot without ND filter and avoiding also too slow shutter speeds for most scenes outside.
Certainly a keeper camera for me - fully mechanical without need of battery, it will work the same with minimum maintenance needed for many years to come.
Wide Angle Rangefinder Lenses with Sony A7R
My previous blog described the general use of rangefinder M lenses on the Sony A7R mirrorless camera. This is part II which focuses on the use of wide angle rangefinder lenses with this camera.
After I bought my A7R, I found myself with a small, compact, and powerful high resolution mirrorless camera but still had to rely on bulky wide angle lenses for landscape and scenery photography. I am using the Canon 17-40/4 L and the rectlinear Canon 14/2.8 II L on my Canon DSLR cameras (also the 8-14/4 fisheye lens, but this is not a typical landscape lens). Those lenses are quite bulky especially when used in combination with the Metabones adapter on the A7R. So I started to look for alternatives which would facilitate size and weight of lenses which could be used for travelling and hikes. I already bought the Leica 50/2 Summicron-M rangefinder lens which amazed me by its sharpness and overall quality.
From experience I knew that I rarely use very wide focal lengths like 14 and 17 mm for landscape photography. Since I already had the 17-40/4 L lens, I also imagined to get something faster which pointed towards a prime lens. Zeiss also makes the very good Distagon 21/2.8 lens which comes with a (D)SLR mount - both price and size of this lens made me disregard this option. This Zeiss lens also exists in rangefinder ZM mount, but reportedly suffers form color shifts and vignetting on the A7(R) sensors. Alternatively, there is another option - the Cosina-Voigtlander (CV) 21/1.8 Ultron lens with Leica M mount. I liked that it is one stop faster than the Zeiss lens and came with a better price tag; also some reviews were positive to use this lens on the A7R. I found one con of the CV 21/1.8 lens - the fixed and not removable lens hood which would make it a pain or impossible to use this lens with graduated ND filters.
I didn't find a good deal for a used CV 21/1.8 lens, so I bought it new. It arrived in the unopened original box. The lens was mint, but when I fist used it, I instantly recognized sort of scratching noise when moving the focus ring back and forward. It didn't sound right because my CV 35/1.2 II lens is very smooth when moving the focus ring. For my first test shots, the CV 21/1.8 lens performed extremely well and with sharp images even wide open, so I kept it. On my first hike with this lens, I had to demount the lens from the camera, when suddenly a metal flake fell out of the lens mount. It turned out that this was the reason for the scratching noise - after the flake fell out of the inner lens barrel, everything worked smoothly with the focusing ring! I was lucky it came off and didn't hit the sensor when the lens was mounted on the camera!
This lens is very well built, metal lens case and engraved clearly visible scales. The aperture ring clicks slightly and stops at half and full apertures. The lens has a 58 mm outer diameter with filter ring. I also decided to get a 3-stop full ND filter with 58 mm size to allow for longer exposure times (especially useful for waterfall photography or in sunny conditions).
When taking photos with blue or grey sky in it, I observed some purple fringing and vignetting in the corners of the frame with the CV 21/1.8 Ultron lens (and independent on the aperture used). I couldn't tell from photos where the whole frame was filled with objects (for example inside a forest or more close up). Likely this isn't caused by the lens itself, more by the combination of this lens with the A7R. The A7 series has a thicker sensor stack than other rangefinder camera sensors have which might cause this. You can remove this fringing and vignetting in post processing, but I found it rather cumbersome to do and to get it right in the RAW file. Fortunately, Sony offers a very good tool to facilitate this - it is called "Lens Compensation" app for A7 and NEX cameras. It costs $9.99, but it is worth the investment especially when using several MF lenses. Leica M cameras use coded M lenses to determine which lens is attached to do this kind of compensation internally.
The Sony "Lens Compensation" tool lets you change peripheral shading (reduces vignetting and purple fringing), chromatic aberration (reduces reddish or blueish borders, and distortion separately for different lens profiles. It is a bit try&error to get the best outcome by changing the settings here - for the CV 21/1.8 Ultron lens, I am using +15 for vignetting suppression, -3 for red, -10 for blue fringing, +4 for red chromatic aberration, and +2 for blue chromatic aberration, no changes for distortion. This nearly removes all fringing, vignetting and aberrations which makes the post processing much more easier. This tool is extremely useful for third party MF rangefinder lenses on the A7 series - highly recommended! Also I should point out that this tool works both for RAW and JPF files!
In general, wide angle rangefinder lenses can be tricky or some even impossible to be used with the A7 camera series. I recommend reading reviews for a M mount wide angle lens with the A7 series before purchasing one. Unfortunately, this information is very scattered and sometimes hard to find in the internet - sometimes even with conflicting reviews. But there are still a few decent rangefinder wide angle lens options out there which work out great on the A7(R) especially when lens profiles are being used.