Welcome to my Photo Blog!
Konica-Minolta Super Rokkor Chiyoko 45/2.8 Lens
Welcome to another LTM lens review on my photo blog! This time we focus on a lesser known lens, the Konica-Minolta Super Rokkor Chiyoko 45 mm f/2.8 lens. The lens was introduced in 1954 and comes in different versions with slight exterior modifications. The lens consists of a 5 element in 3 groups as Heliar/Tessar hybrid design and was highly praised at the time. In Japanese the lens is sometimes associated with the word "Umebachi" which stands for a chrysanthemum flower with originally 16 petals represented by 8 aperture blades in this lens. The lens came with the Minolta 35 Model D camera as standard lens. Older lens versions contain a front bezel aperture window which was omitted in later lens versions (mine is a newer lens version from 1957 and doesn't have this little circular window).
The price for this lens tends to vary a lot and isn't available online too often. I got mine for $160 in November 2019, but I also see prices in the $300-400 range. It is often regarded and sold as lens collector item.
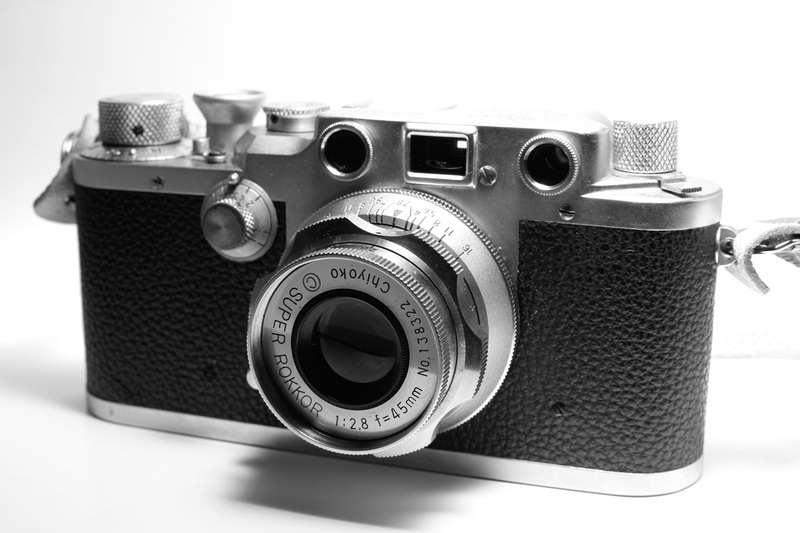

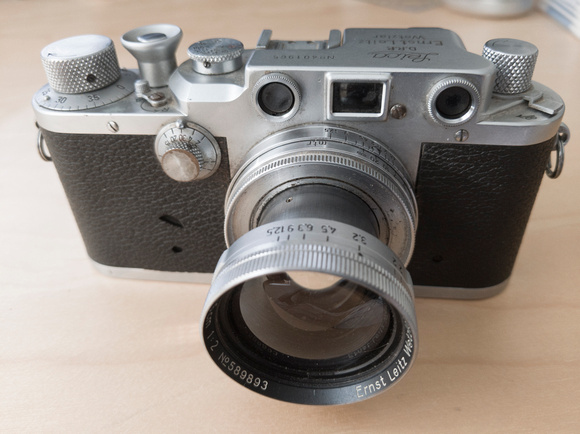
Photo above: Konica-Minolta Super-Rokkor Chiyoko 45/2.8 LTM lens mounted on my Leica IIIc camera.
The lens is very well built and comes in a brass lens housing with interesting looking focus ring which appears resembling a gear. It is very small and compact for a standard focal length rangefinder lens which makes it ideal for travel. The aperture ring is at the front of the lens. The aperture ring moves smoothly without any clicks at the aperture numbers - so any kind of intermediate f-stop can be selected between the full aperture numbers. When turning the aperture ring, the focus ring tends to move, too which can be an issue when quickly making adjustments with this lens. Moving the focus ring also changes the position of the aperture markings - probably the reason why the aperture window in older lens versions made it a bit easier reading the f-stop by looking to the front of the lens. This is especially true in closer focus position around 5 feet where the f-stop can't be easily read. Newer lens versions like mine have two black dots on opposite sides of the focus ring and two two aperture scales to minimize the range of the dot being moved outside the view by looking on the top of the lens to adjust the f-stop.
The lens also has a little focus tab made of metal attached to the focus ring. Depending on personal preference, you can either focus with this focus tab or use the focus ring itself. Closest focusing distance is 1 meter (3.3 feet). The lens tube is fixed and doesn't need to be pulled out for focusing. The 50 mm viewfinder of my Leica IIIc camera can be easily used to compose with this 45 mm lens.
The lens is very sharp and fully coated on all glass-to-air lens surfaces corrected for optical aberration. It delivers excellent color and B&W photographs. I still recommend getting a generic 34 mm screw-in hood and a 34 mm snap-on lens cap.
Pros:
+ Tank-like built and compact pancake size
+ Very appealing look with the gear-like focusing ring
+ Ideal standard focal length travel lens; fits easily in any pocket to carry separate from the camera
+ Smooth aperture rotation to allow intermittent f-stops
+ Very sharp lens with good contrast
Cons:
- Focus ring moves aperture ring
- Aperture stop hard to read when focusing closer at 5 feet
- Heavy for the size of the lens
- Often lens caps have to be purchased separately and don't come with the purchased lens
- Uncommon 34 mm filter diameter
- Collector lens item can drive used prices up
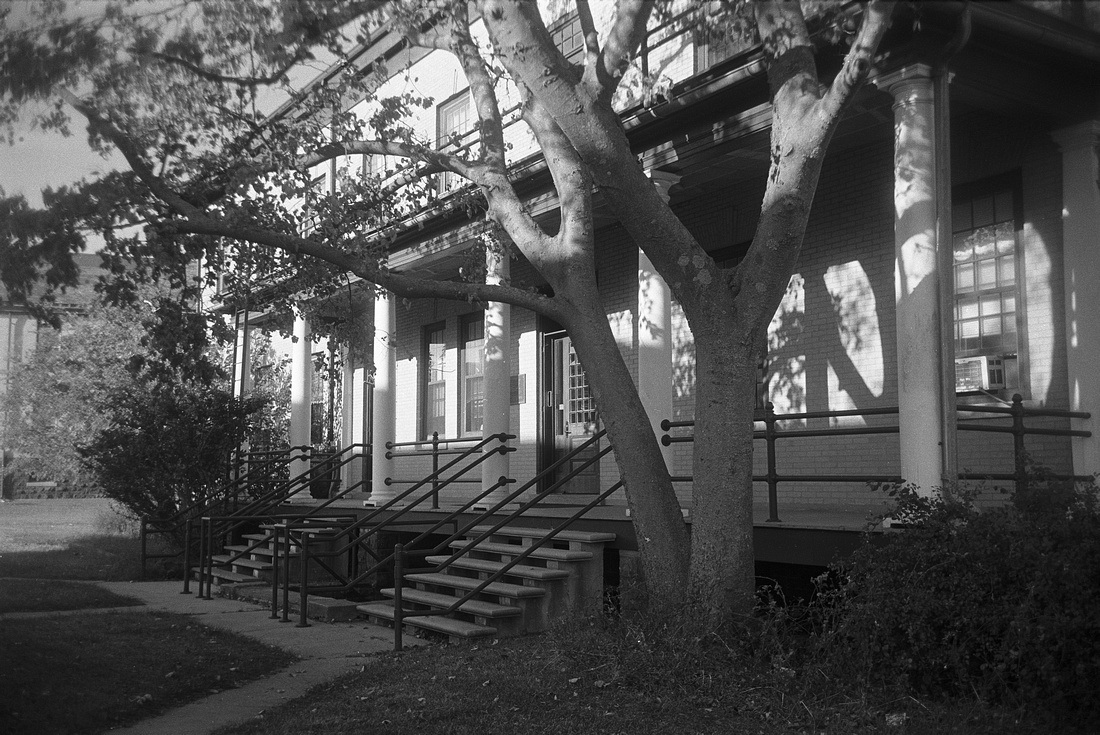
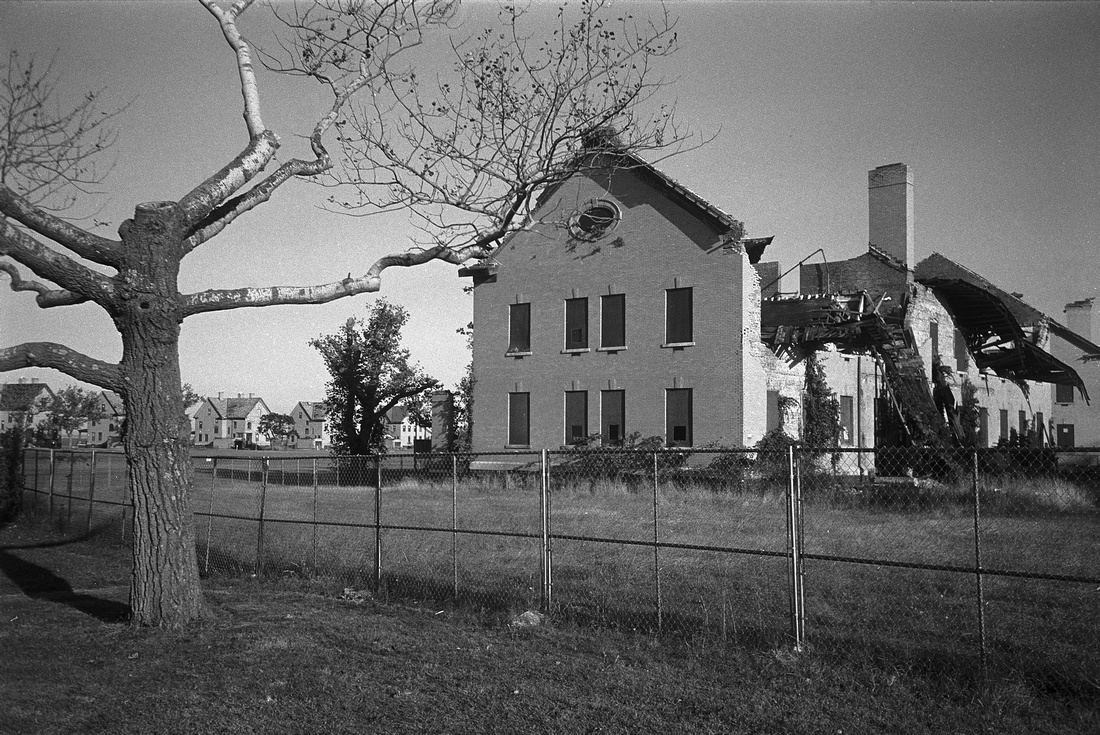
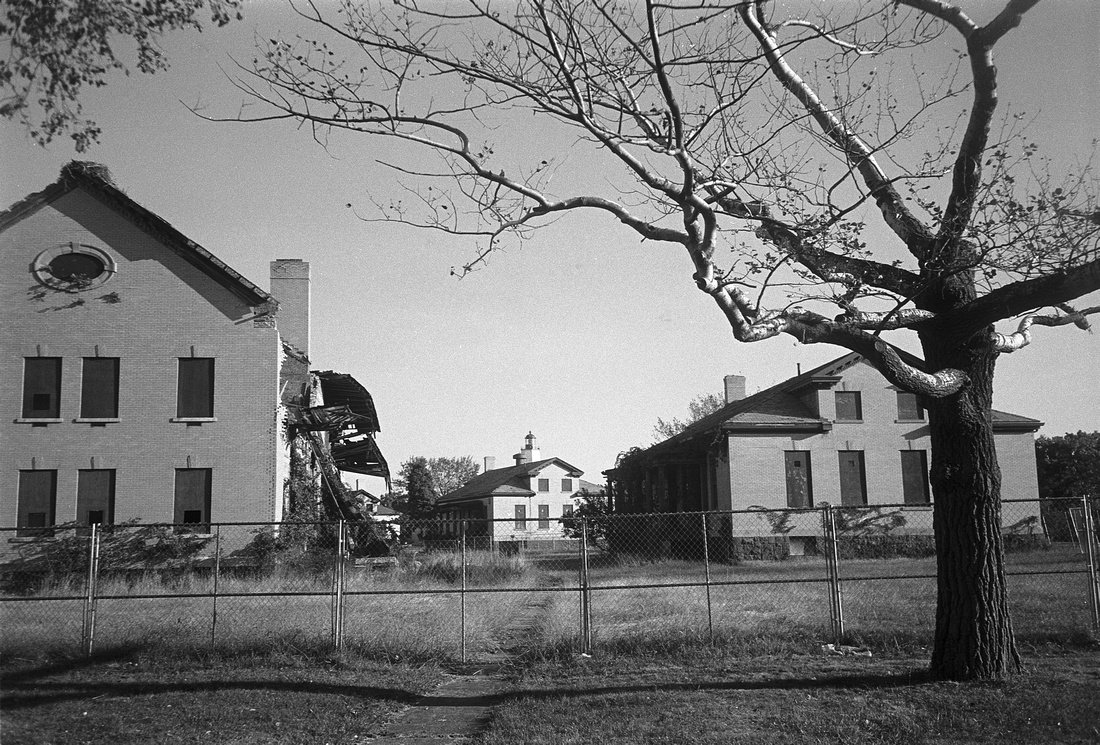
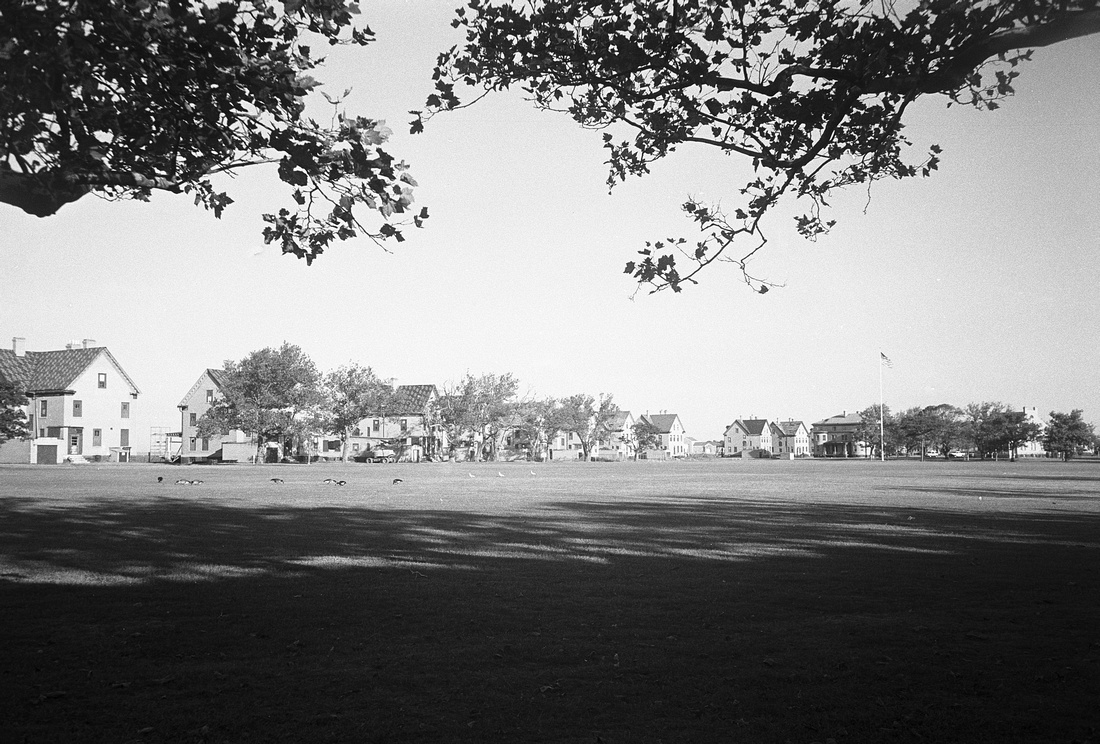
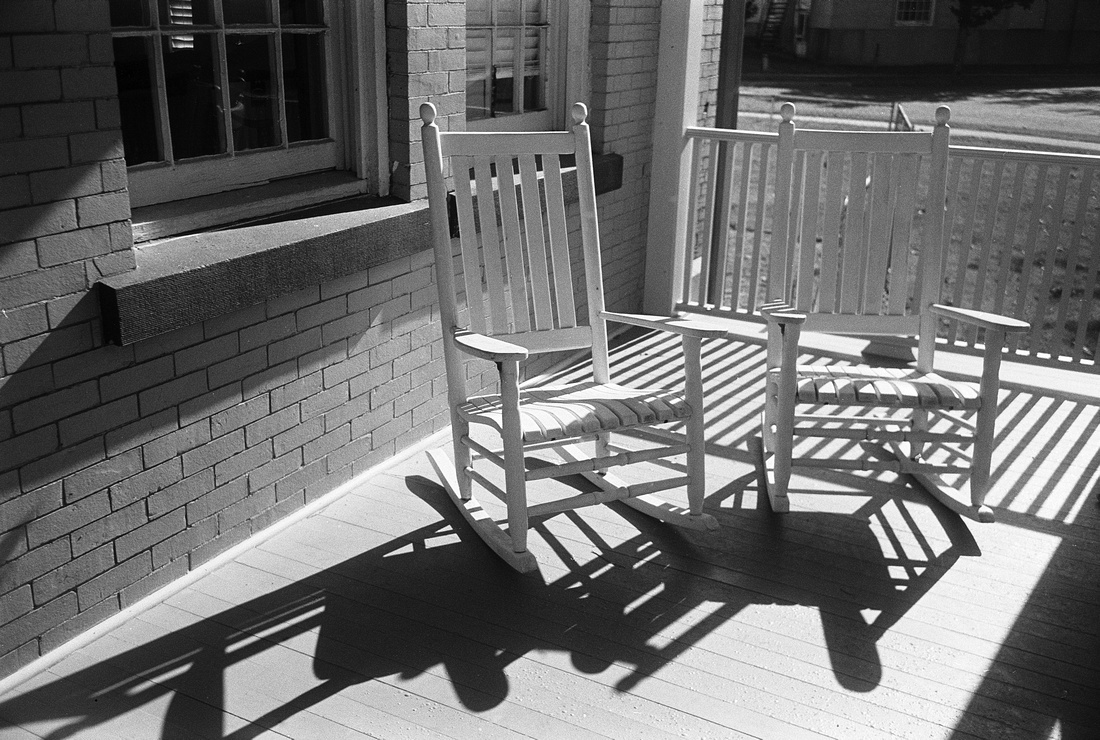
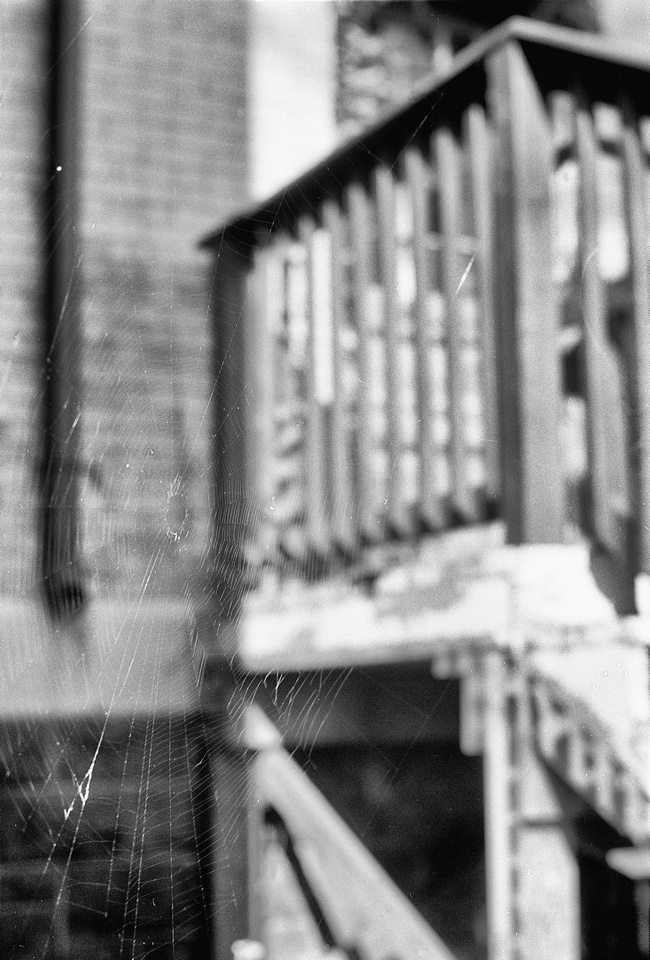
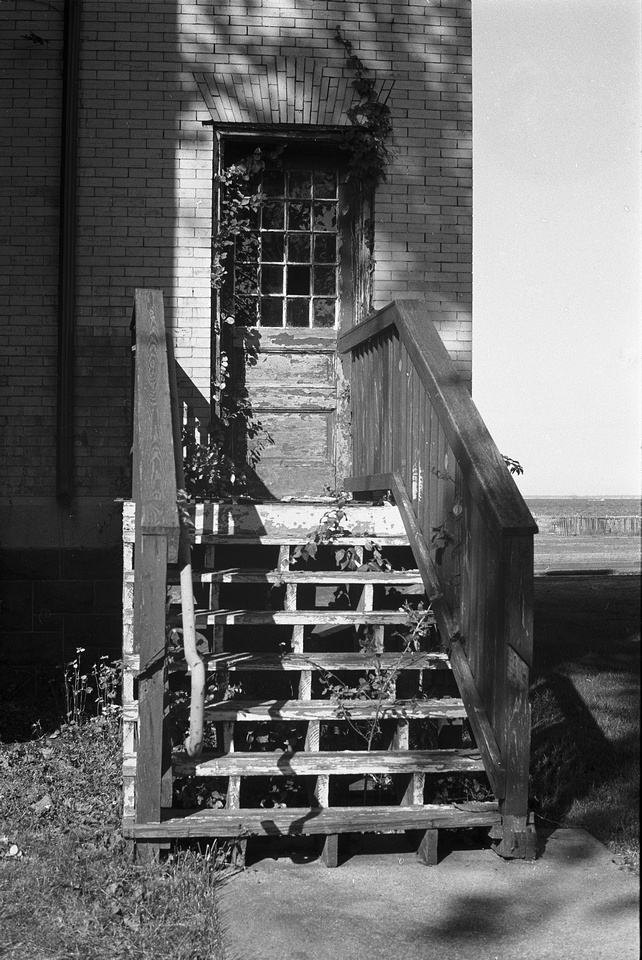
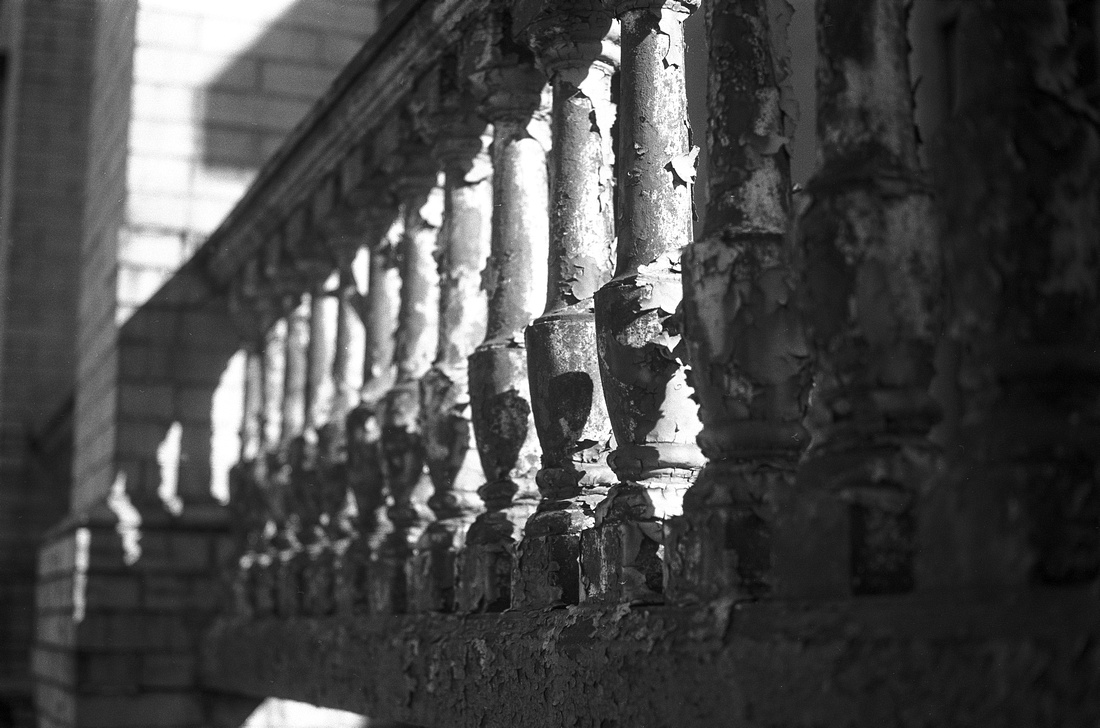
Examples with Konica-Minolta Super-Rokkor Chiyoko 45/2.8 LTM lens on film: (Hover over image to see the technical info)
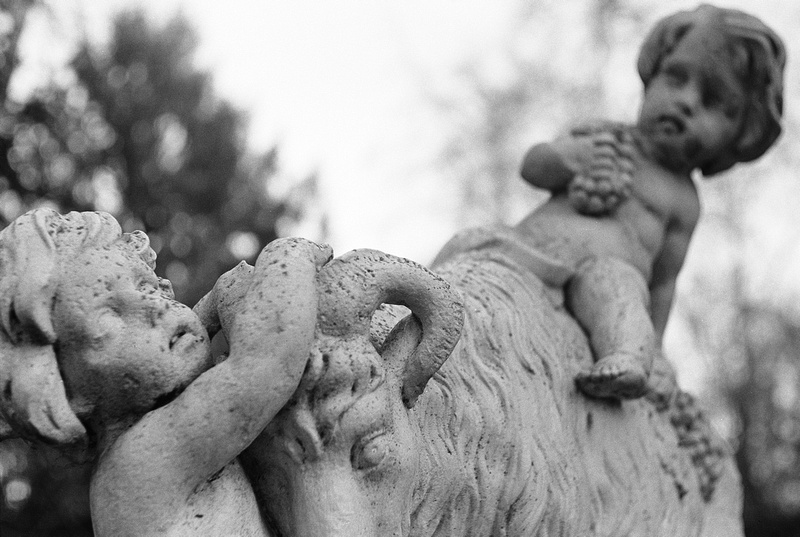
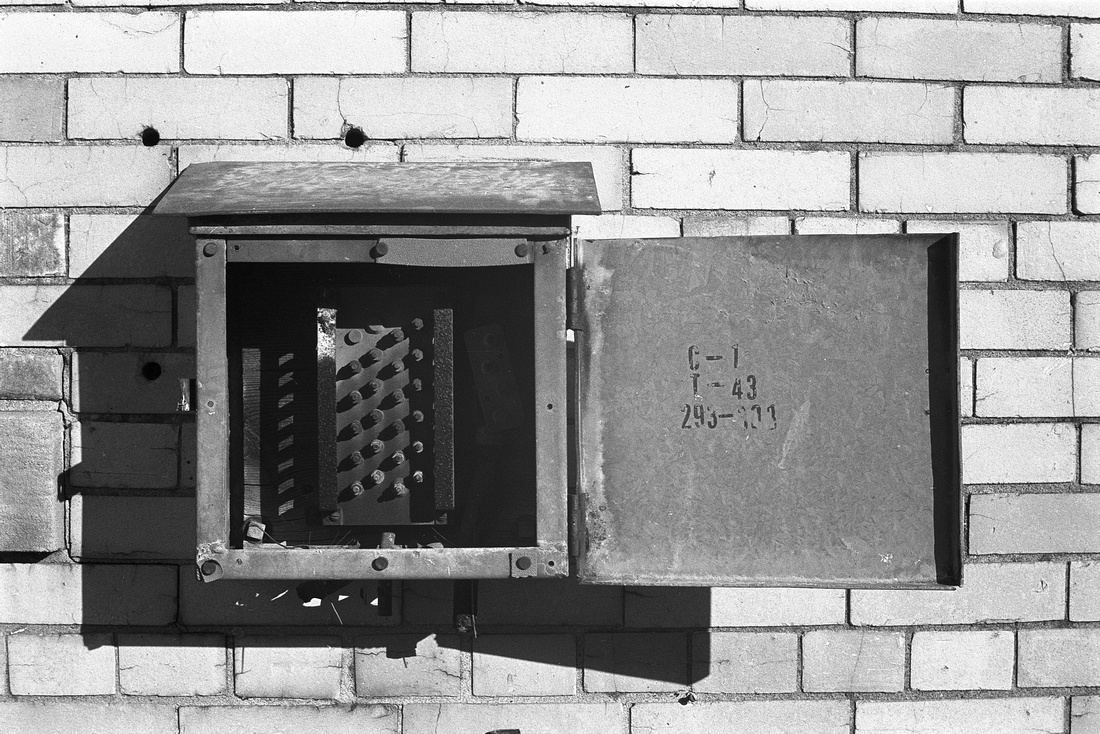
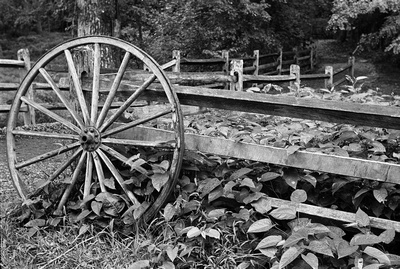
 Ilford FP4+ 125 film developed in Xtol (1:1). Lens aperture f/5.6
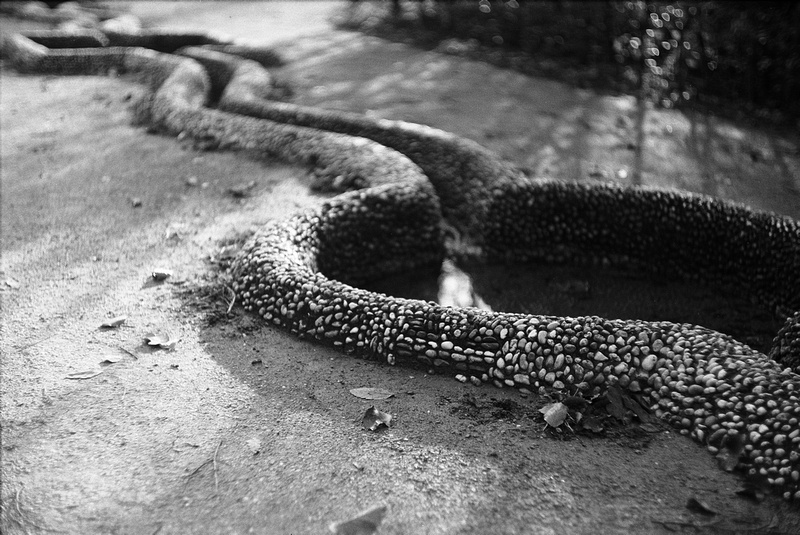
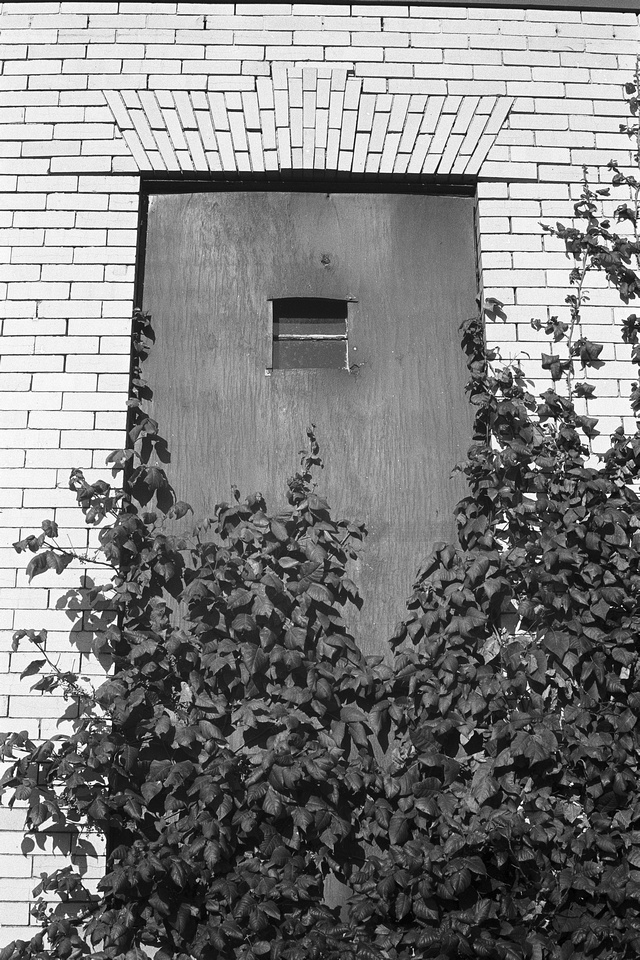
 Ilford FP4+ 125 film developed in Xtol (1:1). Lens aperture f/8.0
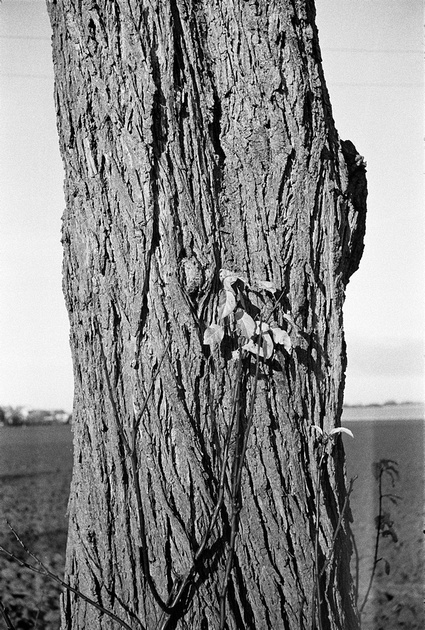
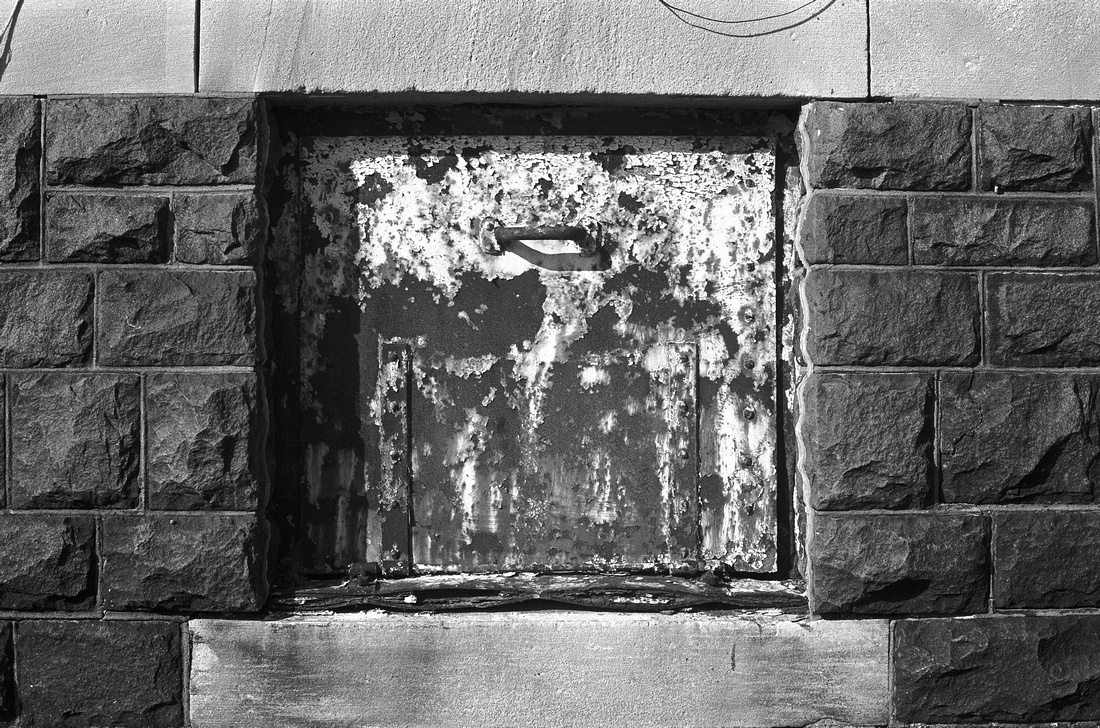
 Ilford HP5+ 400 film developed in Xtol (1:1). Lens aperture f/8.0
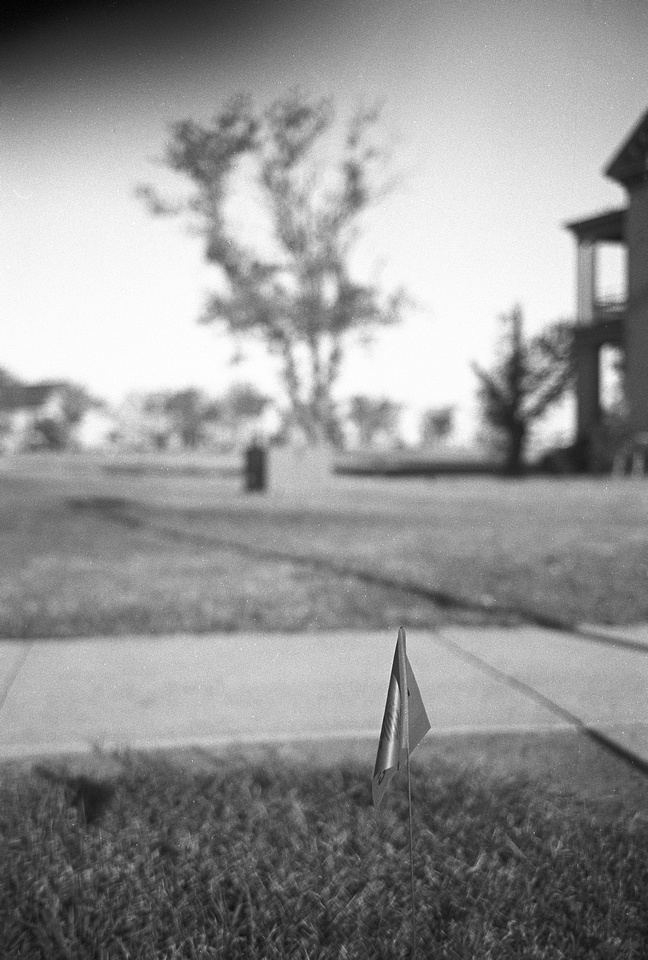
 Ilford HP5+ 400 film developed in Xtol (1:1). Lens aperture f/5.6
Leica 50/1.5 Summarit Lens Review
A new decade has just begun, and never before photographers had so many choices in digital cameras and lenses. Mirrorless cameras are now the forefront making DSLRs not obsolete but putting them in the second row. Some other niches in photography started attracting momentum like film photography in general. Many lenses in different mounts can both effectively be used on film and with adapter on mirrorless digital cameras. This blog starts a series of vintage lens reviews which I tested both on film and digital camera gear. I consider these "gems" because they are either under-represented and might offer unique advantages hard to find elsewhere for a very good price/quality ratio.
Personally I find vintage lenses from the 1940s to 1960s very interesting since some of them exhibit qualities irreproducible with new digital lenses. Why is this? Because > 60 years ago lenses were much more simply built to accommodate lower resolving 35 mm films. Also lens coating technology and very accurate robotic lens element manufacturing did not yet exist or was just at the beginning. Lens bodies were much smaller as nowadays lenses due to much less lens groups used and lack of auto-focus plus other electronic features like in-lens image stabilization. Floating lens elements were introduced first in the late 1970s. Less lens elements and none or minimal lens coating gave many lenses of this era a unique character. Modern lenses purposely removed these characteristics to improve corner-to-corner sharpness of the frame, have less chromatic aberration, minimal halo effects, and higher micro contrast. Good example for this are modern Leica Summilux (f/1.4) lenses which are aspherically corrected and go for a minimum of $4K in M-mount.
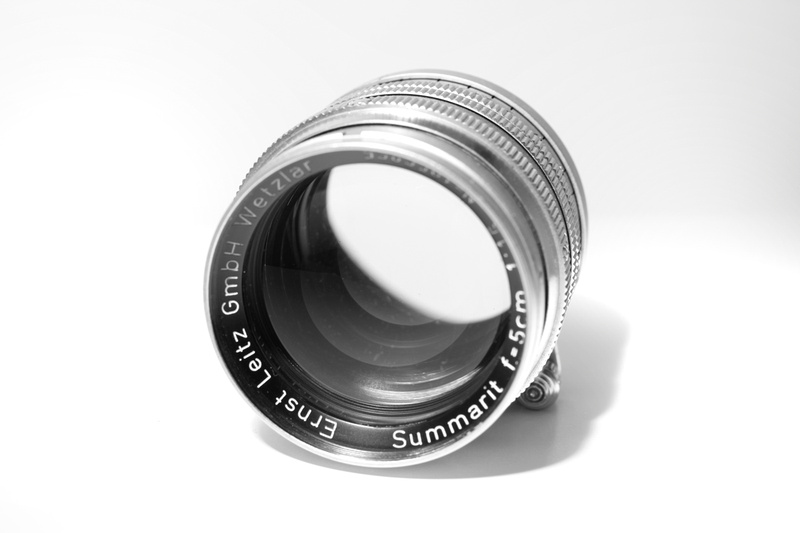
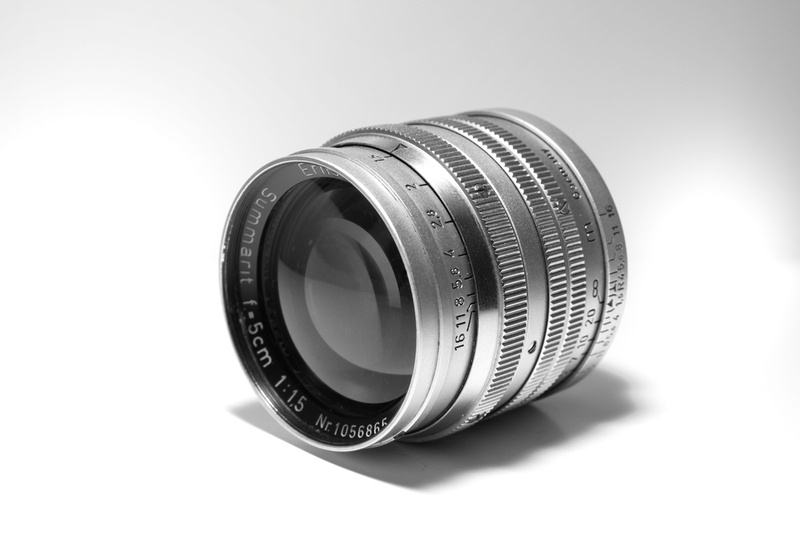
Lesser known but very interesting for those considering vintage character lenses is the often overlooked Summilux predecessor, the Leica 50/1.5 Summarit lens which was made first in LTM screw-mount and later in M bayonet mount. In comparison, this lens if found in very good condition with low amount of scratches on outer lens elements goes between $500-800 as used copy. The name Summarit is now a bit misleading after Leica introduced a novel f/2.4-based Summarit lens line in 2007. Those are seen as entry-level M-mount options for a much cheaper value compared to their f/2 Summicron counterparts. The new Summarit lens designs have nothing in common with the old 50/1.5 design first released in 1949. This 50/1.5 lens design relates to the predecessor which is the Leica 50/1.5 Xenon lens licensed by Taylor Hobson but now came with additional lens coatings for 7 lens elements in 5 groups. The lens is an oddball in the Leica line, and exhibits one property of only few in the history of LTM/M lenses: it transmits UV light, therefore it is highly recommended to use an E41-filter thread based UV filter for film photos (it could be very interesting to be used on a full-spectrum converted mirrorless digital camera for UV-photography!). The lens is beautifully made from brass with chrome finish and weighs 300 grams. The aperture ring has full stops between f/1.5 and f/16. The last stops between f/8 to f/16 are very close to each other on the ring - caution is needed not to accidentally jump over one stop here. Often the minimum focus distance of one meter is mentioned as con of this lens - but for film rangefinder focusing one meter was the minimum distance accessible with the rangefinder path anyway. When adapting this lens to a modern digital mirrorless camera with electronic viewfinder (EVF), close-up adapters can be easily used between adapter and lens mount to allow closer focusing as shown in a few examples below. The lens has a focus tab which locks into infinity position. The lock can be sometimes a bit of a hassle when trying to quickly achieve focusing between infinity (locked) and > 50 meters (unlocked).
I found a very good nearly mint copy of the 50/1.5 Summarit lens in LTM mount on FB Marketplace sold by a fellow photographer. Since I own LTM and M-mount film cameras, I preferred the older LTM mount since I am now able to use this lens on my Leica IIIc and as well on my M-mount cameras with cheap LTM/M-adapter from China. The Summitar lens mounted on my M-cameras is well balanced but attached to my IIIc it leans forward. Focusing works well even on my IIIc - wider open the focus was still spot on!
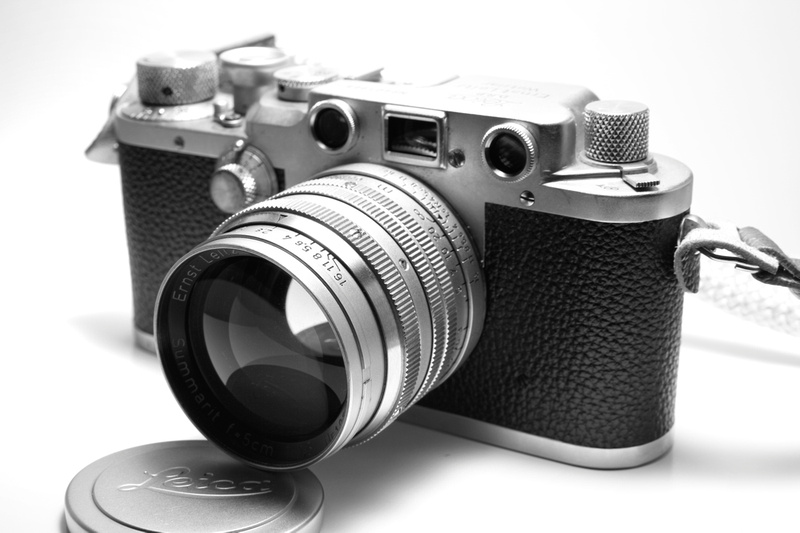
Photo above: Leica 50/1.5 Summarit LTM lens mounted on my Leica IIIc camera.
The lens exhibits a dreamy-like bokeh wide open at f/1.5 and f/2.0. You might need to use an additional ND filter to be able to shoot wide open at 1/1000 sec or less in bright weather conditions. In this fast aperture range the center focus is reasonably sharp but very low in contrast - less visible on film but certainly on a modern digital FF sensor (slightly increasing the contrast in post-processing is needed here). The bokeh balls are nothing like doughnut-like structures often seen with lenses made around the same time like the Leica 50/2.0 Summitar lens (will be reviewed in a future blog) but nicely circular without pattern. Sometimes they can be distorted creating very unique effects in the background - even with some triangular shapes. When closing down the lens aperture to f/4.0 and higher aperture number, the Summarit properties merge into those of a standard vintage Summicron 50 mm lens: sharp from corner-to-corner without distortions. The lens seems to be sharpest in the center at f/8.0 as expected with most vintage lenses. But even closed down, the image keeps a softer look with yellowish tint in coloration.
Even mentioned often as an issue in earlier lens reviews, I didn't see lens flaring as a biggie even when shooting against the diffused sun. I still would recommend using a 41 mm generic lens hood to avoid the clumsy and expensive Leica hood for this lens.
Pros:
+ Excellent portrait look to reveal soft skin without needed digital post-processing
+ Very good built quality: you don't find this quality with modern lenses!
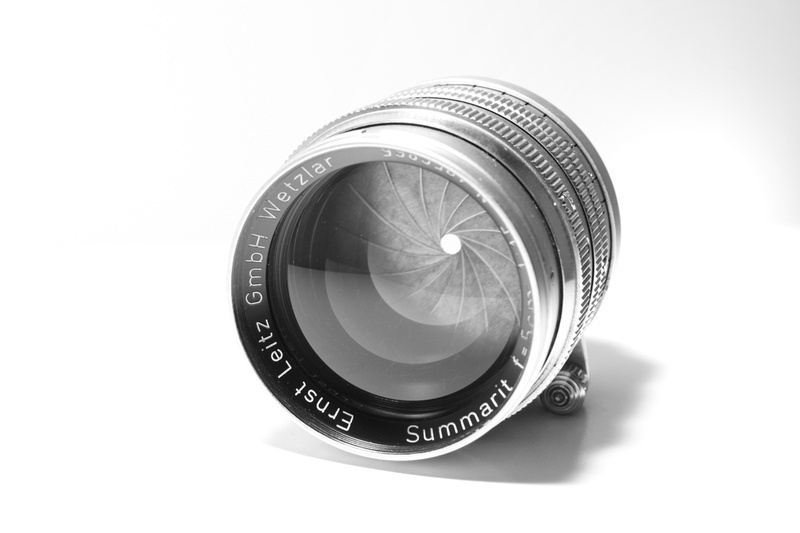
+ Smooth 15 metal aperture blades which close in a full circular way
+ Unique and beautiful bokeh wide open at f/1.5 and f/2.0
+ Good for low light photography
+ Most affordable fast 50 mm Leica lens!
CONS:
- Low contrast wide open
- Minimum focus distance of 1 meter (adjustable with close-up adapters on digital cameras)
- UV filter needed for film photography since lens elements are UV-transparent
- Extraordinary expensive and super bulky Leica lens hoods for this Summarit lens. Better get a cheap generic 41 mm Summarit lens hood!
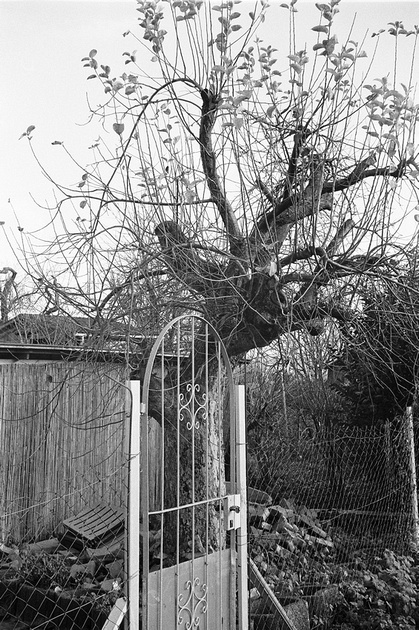
Examples with Leica 50/1.5 Summitar lens on film: (Hover over image to see the technical info)
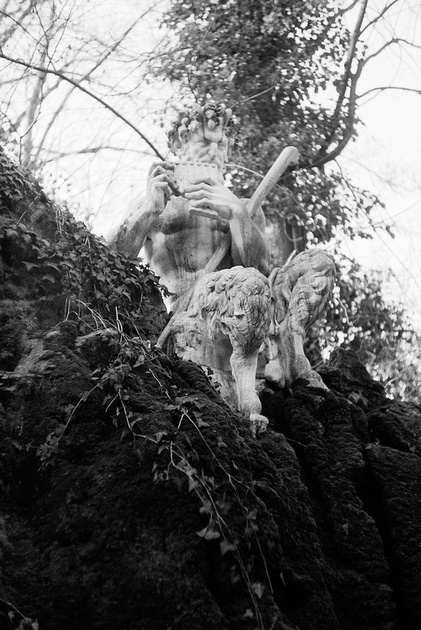
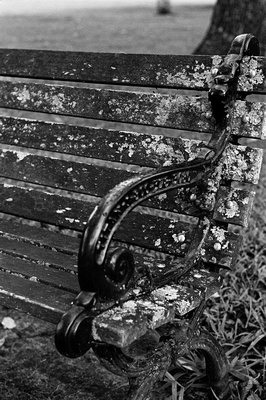
 Ilford FP4+ 125 film developed in Xtol (1:1). Lens aperture f/2.0
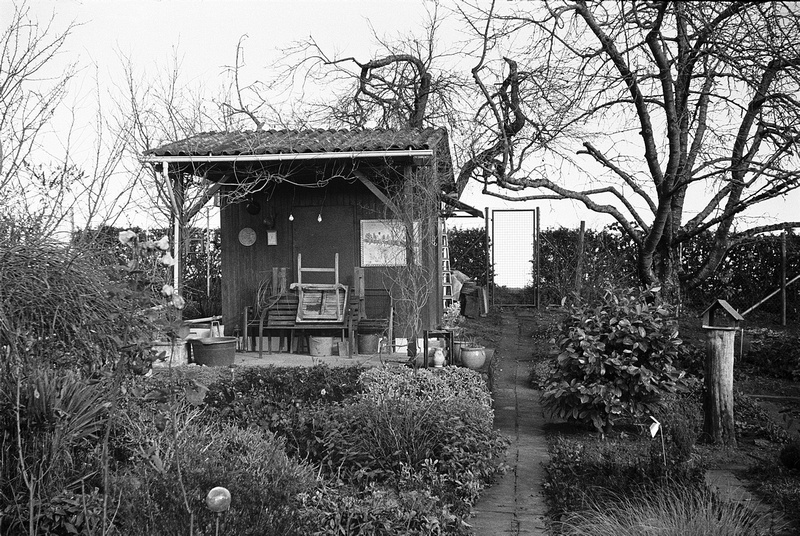
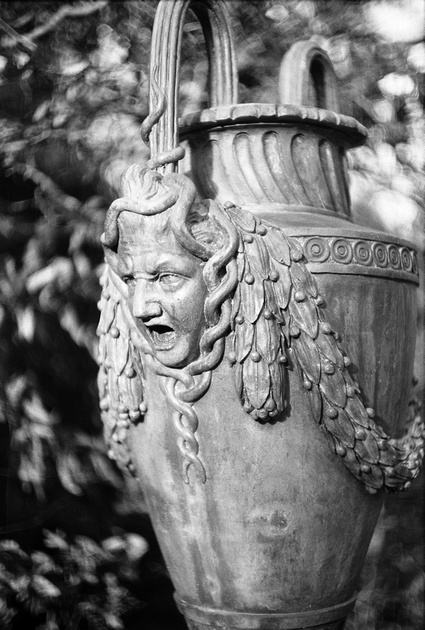
 Ilford FP4+ 125 film developed in Xtol (1:1). Lens aperture f/1.5
 Ilford FP4+ 125 film developed in Xtol (1:1). Lens aperture f/2.8
 Ilford FP4+ 125 film developed in Xtol (1:1). Lens aperture f/1.5
 Ilford HP5+ 400 film developed in Xtol (1:1). Lens aperture f/2.8
Examples with Leica 50/1.5 Summarit lens adapted on Sony A7R with LTM/E-mount adapter: (Hover over image to see the technical info)

Affordable 35 mm LTM Lenses: Russian Jupiter-12 and Industar N-61 Lens Review
After getting my Leica IIIc (see story in my previous blog), I looked for options for an affordable 35 mm LTM lens. Quickly I found that used lens prices in this focal length even on screw-mount are horrific. An original Leica 35/3.5 Elmar lens is already difficult to get just for $350. It is funny - 35 mm seems a focal length high in demand, and since LTM lenses can be used both on M-mount cameras as well as on any kind of mirrorless digital cameras, prices climbed up in general for LTM rangefinder gear. Great deals can still be found for a variety of 50 mm lenses or with longer focal lengths, but at 35 mm things get tricky. Probably one of the best deals regarding quality and price is the Voigtlander Color-Skopar 35/2.5 LTM lens which goes between $250-300.
This is if you stick to the traditional brands. There is an alternative option especially when shooting with film. I already have an excellent Leica 35/2 M-mount lens, therefore I didn't want to spend several hundred bucks to get just another 35 mm LTM-mount based lens. The alternative are lenses made in Russia - they carry names as FED, Industar, and Jupiter. Some wider lenses used after WWII the exact same Zeiss Biogon lens glass and designs after Russia took over some of Zeiss manufacturing plants and lens construction blueprints in Eastern Germany. Later The Russian lenses were mass-produced with lens design variations from the original blueprints. Big advantage for amateurs is that those lenses are still very cheap compared to their western counterparts. But the low cost also comes for a price - Russian lenses tend to have more copy variation due to a much lower quality control in the plants. They suffer from some lens curvature making the image less sharp in the corners of the frame if not stopped down to f/11 or f/16. This field curvature with color cast issues in the corners of the frame is much less severe on film than on digital cameras. To use it on my Leica IIIc camera, I was more interested having a lens with character and a less perfect one.
I read some reviews and watched Youtube videos about the Russian Jupiter-12 lens - which is a 35/2.8 lens - which seems to be mostly fine especially on film where I wanted to use it mainly for. Prices for this lens have also risen in the past few years obviously driven by higher demand. I found prices mentioned in reviews dated several years back of $50 which I didn't see anywhere today. Even worse, known used photo gear resellers in the US have this lens listed by name but always shown as unavailable. I suspect there is not enough revenue for them to purchase and sell cheaper Russian lenses. When I screened the market, I did not find any Jupiter-12 lens offered in the US. On Ebay, prices were about $80-100 without shipping fee from Russia or Ukraine. Not so cheap either for a high uncertainty what I might be getting and without an easy way to return the item if needed. I waited a while, and then found an offer on Ebay for a Jupiter-12 lens in good condition with silver-looking metal housing for $60 (plus $25 shipping). The lens was made 1960 in the Lutkarinskij Optical Glass Plant and is likely one of the PT0825 series. I highly recommend reading the description of the lens on the Ebay posting in detail since the lens condition is key. The value of the lens is also connected to the manufacturing date, where it was made, and which version it is. I focused on a lens which is optically in very good condition without fungus, dust, or scratches and cared less about the lens version. As a bonus, this lens came with newer lens coating reducing flare. I figured this was worthwhile trying and ordered this lens. It took nearly 4 weeks to arrive here in the US - but it also came a long way from Siberia.
The lens arrived well packaged in bubble-wrap inside a small cardboard box. As shown in the item's description on Ebay, it came with the front cap but unfortunately had no end cap protecting the sensitive protruding lens element in the back (there was no end cap shown on the original Ebay post either, but I still hoped it would be included). The lens seemed disassembled at some point because the focusing ring was a bit loose. I could easily fix this by adjusting one of three little screws on the focus ring. The focus ring moves smoothly between 1 meter to infinity. Only in the small gap between M (macro) and 1 meter distance, the focus tends to be a bit jumpy and less smooth. The lens elements all look very clear without dust or scratches as promised. The aperture ring - which is accessible as rotating plastic element where normally the filter sits on other lenses - moves well, and the aperture blades change accordingly. The aperture ring serves a secondary purpose since it is built like a lens hood. The lens sits well protected deep inside this ring. The purple-blue lens coating reflects when directly looking onto the front lens making it hard to see the actual aperture blades. The large lens element on the back of the lens also looks like new and fully free of scratches. Only the lens barrel below the screw mount shows some wear of past usage which does not affect usability. The screw mount of the lens is fine and fitted perfectly on my Leica IIIc camera. The outer silver lens barrel looks nearly mint and must have been well cleaned before it was sent to me. The rangefinder focusing also works extremely well with this lens at all distances. Online I found on an older website the hint that a plastic film canister protects well the rear end of the lens in case the original cap is missing (The original caps alone go for >$15 on Ebay!). So overall not a bad deal for $60 - now I was curious how it would perform actually taking photos with it.
The Leica IIIc has only a viewfinder adjusted for 50 mm focal length. Any other focal length requires an external viewfinder sitting on the camera's hotshoe. For 35 mm focal length, I am using my Braun Paxette external viewfinder for 38 mm. Advantage is that this viewfinder is small and fits with its aluminum barrel perfectly on the brass metal of the camera. I simply estimate for the missing 3 mm in focal length which is fine.
I took a couple of shots with the Jupiter-12 on Ilford PanF+ 50 film on a sunny morning. I explored apertures wide open to stopped down to f/11. At f/2.8, the center of the image is still sharp but the rest is all blurry providing some nice effect. Con here is that the lens flare instantly can become an issue - I hoped the outer lens would be protected sufficiently by being quite deeply inserted inside the lens barrel but unfortunately this is not the case. Even with a "R" coating I got flaring and overexposure in the upper left corner of the frame since the sun was on the right when taking the photo.
Jupiter-12 at f/2.8
At f/4 the lens is still only sharp in the inner image circle, the corners look like creamed with vaseline. This might give some interesting vintage-looking effects, but when I took the photo this was undesired. Even f/5.6 still doesn't make the details in the corners of the frame sharp - it's getting better at f/8 but still not sufficient. To get a decent corner-to-corner sharpness, this lens has to be used at f/11 - which makes it a very slow lens especially when using low ISO film speeds.
Jupiter-12 at f/4.0
Jupiter-12 at f/5.6
Jupiter-12 at f/5.6
Jupiter-12 at f/8.0
Jupiter-12 at f/5.6
I expected a bit more of this lens and felt sort of disappointed when I scanned the developed film negatives. It might still be okay for some vintage-looking full body portrait shots where the corners have some artistic blur - no other lens can do this easily like this one does. For now I am keeping it but decided to buy online a better Canon Serenar 35/2.8 LTM lens for triple the money paid for the Jupiter-12 lens (performance of this lens will be part of a future blog).
I was also fortunate to acquire locally a Industar (FED) N-61 lens which also comes with M39 mount, PT4735. It was formerly used on a Russian FED3 rangefinder camera where this 52/2.8 lens came as standard lens. The lens is available in different variations with slight variations in focal length (50 to 53 mm) - mine is the quite common nicknamed "Zebra" version made between 1965 and 1972. The serial number on my lens indicates it was made in 1965. It uses a Zeiss Tessar lens design and is coated. This lens goes around $20 online and is a great deal for the image quality it delivers. It is not a very fast lens with f/2.8 but its aluminum lens barrel and small lens elements make it very light and compact. My lens copy had no scratches and no visible delamination issues. It has 10 aperture blades which close in a circular pattern (I read that the newest version of this lens uses a star pattern instead when it closes - it provides a very artistic but also unnatural looking bokeh IMO). Unfortunately the filter size diameter of 40.5 mm hinders to use my standard 39 mm filters on this lens. But my original Leica lens hood 12585H which came with the Summitar 50/2 lens fits perfectly also on this lens (it clips on from the outside).
In opposite to the sort of mushy Jupiter-12 lens, this Industar N-61 lens was a big positive surprise to me. The scanned negatives taken with this lens blew me away regarding sharpness - it certainly is sharper in the corners than my Leica 50/2 Summitar lens. Little details in the corners of the frame can be easily seen even at wider open apertures with this N-61 lens. This lens competes in the league of best slower 50 mm lenses which I own - and this only for $20! It also works flawlessly adapted on my Sony A7R for digital photos.
Industar N-61 at f/4.0
Industar N-61 at f/8.0
Industar N-61 at f/2.8
Industar N-61 at f/8.0
Industar N-61 at f/5.6 or f/8.0
 Industar N-61 at f/5.6
Leica IIIc and Screw-Mount LTM Lenses
THE STORY
Already owning Leica M film cameras, it might come to a surprise why I would bother with an earlier Leica camera made in the late 1940s after WWII. By chance I saw that an auction house two hours away from my home listed this Leica IIIc camera with original Leica 50/2 Summitar lens and two additional chrome M-mount lenses as part of an upcoming auction in which I was interested in also for other items (microscopy-related gear and books). The camera's serial# revealed that it was not a collector item but a standard series instead. So I decided to take a day off from work and head down to PA early in the morning to have a closer look at the items I was already interested in by seeing the posted photos online. The camera obviously hasn't been used for a long time - the lens was quite dusty on the front lens but otherwise scratch-free, and the aperture ring was a bit sticky but worked fine. The camera body had a little crack in the skin, both the rangefinder and the viewfinder windows were very hazy inside and nearly unusable. But the shutter seemed fine and also most shutter times still worked well judging by the difference in time for the shutter to close. Only a few slower shutter times didn't work. I quickly realized that the camera had no major drawback, and mostly might just needed CLA (cleaning-lubrication-adjustment). Interestingly, there was an original Leica manual underneath the camera in the box - but for a Leica M3 camera which I already own. The M3 camera itself was not part of the auction - I never found out what happened with it but suspect that someone kept it before it could become part of this auction. The additional two Leica lenses in chrome versions - a collapsible Leica 90/4.0 Elmar and a Leica 135/4.5 Hektor lens came both in M-mount and were obviously part of the M3 camera set but added in error to the Leica IIIc screw-mount camera. Both M-mount lenses were in very good shape and made in the late 50s, just a bit dusty on the outside. At this point I set in my mind the highest possible bid for the package and hoped nobody else would be as interested in it as I was at this point. More people entered the auction hall afterwards, and a bunch of them looked at the camera but either had no idea how to operate it or were scared by the dusty/old appearance.
After a few hours in the auction - which was also streamed for online bidding - finally this Leica camera gear had its turn. It started with $10 and went quickly up to $100 - then it was just me competing with another bidder in the room and someone online. The price continued to increase, at $150 the other bidder inside the room left, and it was just me and the online bidder. My comfortable limit in my mind was set to $300, so I came closer and closer to this when the price went above $200. Lucky me the online bidder stopped adding bids after the $250 mark was reached - I was the only one remaining and got all for this price (plus auction fee and tax of course). It was a very good deal, and I saved enough money here to send the IIIc with Summitar lens in for CLA for another $200. When I received the camera with lens back from service, it looked amazing - new skin, clear rangefinder and viewfinder windows, shutter times fully operational, all mechanical parts moving smoothly. The lens was cleaned inside out and then reassembled - it looks like new. The other two chrome M-mount lenses I received work flawlessly after a bit of cleaning by myself on my M-mount cameras - especially on my Leica M3 with its 0.91x viewfinder. I found that currently each lens is sold online between $300-$400. But for now they are keepers for me, too.
The look of the Leica IIIc with Summitar 50/2 lens after the auction. Some cracked skin on the lower left, a bit dusty, and hazy windows, and not fully working slow shutter speed dial were the only obvious camera issues. The lens was scratch-free for its old age!
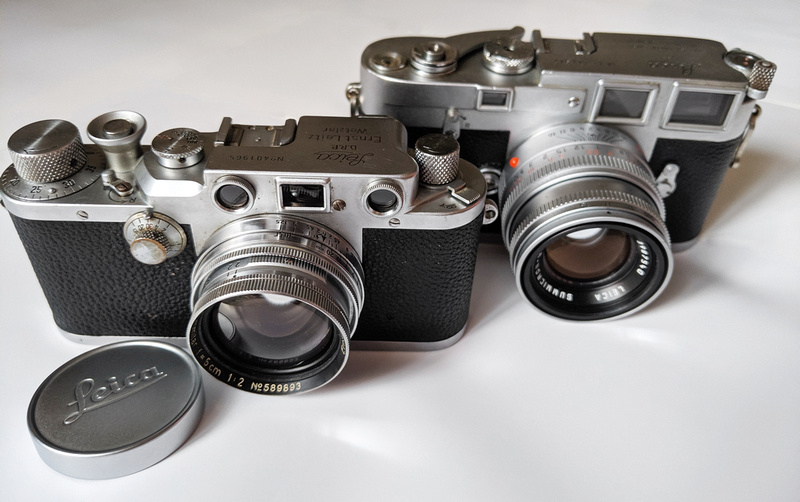
The shutter curtain of my Leica M3 (in the back of the photo) broke just at the time when I got the IIIc - both made a trip for service and repair. That's how the cameras - Leica IIIc and M3 - looked after I got them back. Also the Summitar lens was cleaned and lubricated. All looks like new! The size comparison is misleading in the photo: the IIIc is much smaller in size than the M3 in the back!
LEICA IIIc REVIEW
The IIIc camera is clearly its own class of so-called Leica Barnack cameras. They are fully mechanic cameras without need of battery and have no light meter. Lots of levers and buttons to operate the camera correctly - not the right tool to make fast adjustments during some shooting. But the built-style and vintage look - simply superb. The III-series is much smaller in size than the later produced first Leica M-cameras (M3 and M2 for example) and built as a rigid steel/brass body. The original L39/LTM series lenses were collapsible which additionally kept the rangefinder lens size very small to carry. I wonder which kind of modern camera would last over 70 years and could still work with some lubrication and cleaning like on its first day. Even taking electronic materials out of the equation, a camera isn't built like this since many decades.
Leica made sure that all cameras which followed the original III-versions could still use the original screw-mount lenses with thin adapter on the newer bayonet M-mount. On the other hand, it causes a major hurdle when trying to go the other way like I did now - I started with M-mount cameras and lenses and now suddenly owned a screw-mount camera. I figured quickly that M-mount lenses unfortunately do not fit on the older LTM/L39 cameras: the flange distance of screw-mount LTM cameras is longer than the ones of newer M-mount cameras (which seems a contradiction on the first look since the IIIc camera is smaller in size compared to the M3 for example). This means that the adapter to mount a LTM lens onto a M-mount camera compensates for the shorter flange distance of the M-camera and pushes the LTM lens a bit further out. But you can't use a M-lens made for a shorter flange distance on a camera which requires a longer one! So all my nice an d excellent M-mount lenses don't work on the IIIc. Even this is a bummer, it has one benefit: The IIIc forces me to use LTM lenses which might not be as optimized for later quality requirements - a real vintage- and character-style shooting experience!
I downloaded a user manual for the IIIc and watched some You Tube videos online to know how to operate the camera correctly. It was a short learning curve for me since I am already used to film gear and newer Leica cameras. One thing which was new to me was the bit cumbersome film loading with the IIIc: First, the film strip needs to be cut in a unique way to enable the camera to reel it. I found best is to make a cardboard screen which can be held onto the film strip to cut 10 cm in length off the top. Very important is to have exactly two sprocket holes open before the strip ends at the film cartridge outlet. I found this not well documented in the Leica manual I downloaded but much better described in some "How to Insert Film Into the Leica IIIc" videos. Next the film spool has to be taken out of the inside of the camera - it is a good idea to check that it is included when buying a used Barnack camera! The end of the film strip is squeezed into the spool - make sure the spool is in the correct way which means that it will appear awkward since Leica decided to have the film sitting in the camera with more tension to flatten it against the original turn how the film is rolled inside the film cartridge. The most tricky step comes next to insert cartridge and spool correctly placed in the camera - later M-camera models have a self-adjusting mechanism which moves the advanced film in the right position. The IIIc does not have this - to check that the film is placed correctly, fire one or two exposures, remove the lens on the camera and then use the "B" shutter position to see inside while pressing on the shutter release. The shutter curtain will remain open and makes the film plane visible while the shutter release is pressed. If you see any kind of sprocket holes on top or bottom, you need to reverse the film, put it back in the camera and check again until all sprocket holes of the film are covered. This is very cumbersome and makes changing a film in the field nearly impossible to do quickly. It is IMO the biggest drawback of the camera. But like with anything, the more often you practice the easier it will get.
If you are used to a modern digital, SLR, or modern rangefinder camera, you will be confused to see two little windows next to each other on the upper left on the back of the IIIc camera. When this camera was made, Leica still had the rangefinder focusing path and the viewfinder separate from each other - therefore two windows for each. With the left window you focus on a magnified central area in your view by bringing two frames on top of each other like any other rangefinder focus works. I found it remarkable that this older rangefinder style uses a bit of yellowish circular spot in the middle of the focus area in the rangefinder path which actually helps to bring lines together to achieve focus. I am not sure if this is standard in all this kind of cameras, or if this is a bit of a fluke just in my copy - in any way it is not obstructing and actually helps. The right window is the viewfinder adjusted for 50 mm focal length. After shooting a few films with the camera and the attached 50/2 Summitar lens, I can tell that the viewfinder window is just a rough estimate of the view you will be getting in the final image. The viewfinder gives you a bit wider field of view that what you actually get with a 50 mm lens. I believe that this is the reason why some use an external 50 mm viewfinder on the camera's hotshoe to allow better framing. But since this is a vintage camera fun for me to shoot with, I simply deduct a bit on each side of the viewfinder's frame to be fairly accurate on the taken image.
There are no other "frame lines" with this kind of camera - for any other focal length than 50 mm, you rely on an external viewfinder. When you consider getting one, best is to ask yourself first which kind of focal length you will be shooting with this camera. You can potentially get a Leitz VIOOH finder which has multiple viewfinders for 35-135 mm range in a revolver-like device setup. It is very bulky and likely attracts attention - I rather prefer a smaller more inconspicuous one. Since I am shooting more wide than tele, I continue using my Cosina-Voigtlander 21/25 external viewfinder also on my IIIc. When I get my 35 mm screw-mount lens, I will be using my cheap little Braun Paxette 38 mm external viewfinder which is sufficient (35 mm LTM lens review will be part of a future blog).
Talking of wider than 50 mm screw-mount LTM lenses - I was shocked to see online prices of old Leitz lenses. I suspect collector demand drove prices up especially for 35 mm Leitz LTM lenses. But also older Nikkor and Canon LTM lenses go for (too) much IMO. After a while of digging and searching, I found a more reasonable option as used copy online for a Voigtlander 25/4.0 Snapshot-Skopar LTM lens which I intend to use with adapters also on my M-cameras and my digital Sony A7R. I didn't know when I bought it, but the 25/4.0 has no rangefinder coupling. The lens is purposely built not to use the rangefinder focusing but simply to estimate the distance. Hyperfocal distance setting is very good with this lens which leads to excellent sharpness at f/8 for nearly all shots I took with this lens. It is the smallest wide angle lens I own - it fits in any pocket! If you shoot wider, I highly recommend this lens (and external CV 21/25 viewfinder) for the IIIc-type camera.
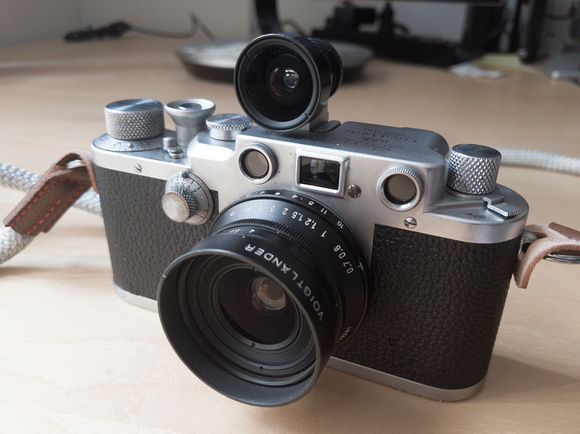
Leica IIIc with attached Cosina-Voigtlander 25/4.0 Snapshot-Skopar LTM lens and Cosina-Voigtlander 21/25 external viewfinder. The lens is super small and light for a 25 mm wide angle lens with f/4.0. You can tell from the distance scale that the focus ring doesn't need to be moved much between 0.7 meters and infinity.
The collapsible Leica 50/2 Summitar lens was produced in the 30s/40s in many different versions and iterations, and only collectors and experts for this kind of lens gear know all the differences between them. I know that mine was manufactured in Wetzlar/Germany in 1942 judging by its serial# - during WWII! It might have an interesting history to tell how it made it to the US and how many owners the camera and/or lens had before I got my hands on it. At the time not many were able to afford such camera gear in Germany. Judging by the condition of camera and lens, they were likely not traded and used too often. To see the Summitar lens unscratched with > 70 years after its manufacturing date is very unique. After having it serviced, I was told that there is some minor lens delamination starting on the side of one of the lens elements, but it does not affect image quality. Delamination is quite normal for a lens of this age. At the time when this lens was produced, Leitz also did not yet apply coatings on this lens.
The lens blocks a little bit one of the viewfinder corners which I didn't find an issue but worthwhile mentioning since this lens does not block the viewfinder attached to M-mount camera bodies. The lens delivers very sharp images in the center but even at around f/8 the corners tend to be slightly unsharp which is the character of the Summitar lens. My lens has some unusual f-stop numbers engraved, so f/5.6 or f/8 have to be sort of guessed. There are no click-stops on the f-stop dial, the 10-bladed diaphragm is opening and closing smoothly depending on the reel position. Supposedly this lens provides beautiful sunstars, but I haven't explored this option yet.
In the field, I found the IIIc is easier to operate than expected. Winding to the next frame takes a bit longer with the turning knob compared to M-cameras with single or double-stroke lever. But you likely won't use this kind of camera for action shots in the first place - the IIIc slows you down just enough to think about a good composition but is still fast enough to be used well for street photography. The camera feels extremely pleasant in my hand to hold it. I bought a cotton leather neck strap for the camera, and it didn't bother me at all carrying the IIIc for hours. The rangefinder focusing worked extremely well in sunlit and cloudy conditions as well. To my surprise, the shiny protruded lens element of the Summitar lens did fortunately not gain attraction either. It is still all very small and compact. The design of this camera is nothing but beautiful and everything seems just right in the positioning of buttons and levers. After reading online reviews and watching videos about the III-series, I was ready in my mind for some slow-downs and drawbacks to actually use this camera but the opposite happened: it quickly became a favorite tool to shoot 35 mm film.
The only hassle brings me back to the film loading with the IIIc. When using M-cameras and the IIIc in parallel, you have to use best judgment upfront which kind of films you might use during a field trip with the IIIc. Cutting the film lever into the desired length and form seems quite an inconvenience when being outdoors, so it better has to be done earlier at home. You could still use the film with prepared long film lever when changing plans and intending to use this film for example with a M-mount camera instead - a simple cut with a scissor will do but some exposures will then be lost compared to a regular 35 mm film.
One more advice in regard to the tripod mount: similar to older M-mount cameras, the IIIc uses a 3/8" screw-mount tripod mount. Most tripod plates these days use a 1/4" screw - you need an adapter to fit it into the mount on the camera's base plate. But careful - regular 3/8" to 1/4" adapter screws protrude quite a bit on the IIIc base plate (they work perfectly fine for the M3 for example!). You have to file off a bit from a regular screw adapter to make it fit, or you order a so-called screw adapter for Rolleiflex and Rolleicord cameras which seem to have the same length.
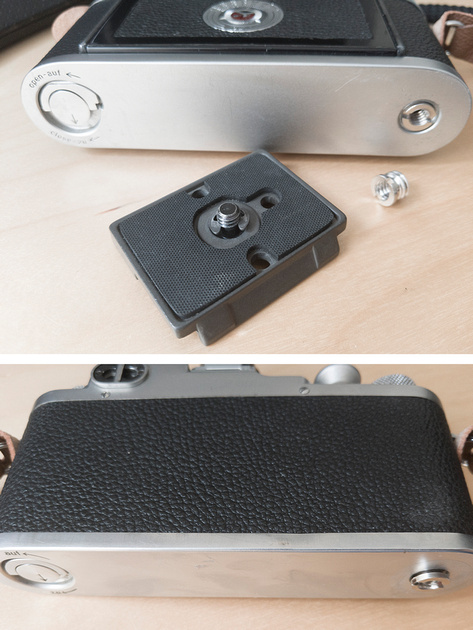
Surprise, surprise....the generic 3/8" to 1/4" screw-mount for 1/4" based tripod plates fits well on the Leica M3 base plate (top) but protrudes quite a few mm on the Leica IIIc with thinner base plate (bottom).
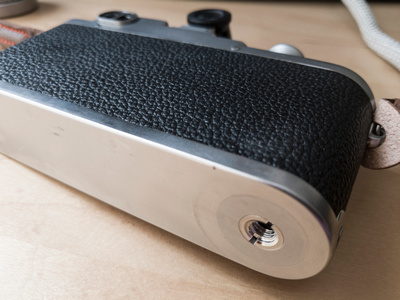
Getting the fitting Rolleiflex/Rolleicord screw adapter for 1/4" tripod plate mounts works!
USEFUL ACCESSORIES FOR THE LEICA IIIc
There are a few quite affordable accessories which come in handy with this camera body. I tend to stay here with third-party suppliers since they are much cheaper than the original Leitz/Leica items (and do the same in the end):
(a) LTM/M adapter (approx. $10): very useful to mount LTM lenses also on other M-mount cameras. I can even mount the LTM/M adapter directly onto my M/E-mount adapter to use screw-mount rangefinder lenses on my Sony A7R camera.
(b) Cable release. To use this, I have to unscrew the shutter release button to gain access to a screw thread surrounding the release pitch. The cable release can be fitted onto this screw mount. Less well known but works well also as cheapest option is getting a Nikon AR-2 style cable release. They go online for approx. $20 or sometimes even less.
(c) Mentioned earlier in my review is the wide open field of non Leica-based screw mount rangefinder lenses for decent prices (approx. $50-150 for non collector items also dependent on the lens focal length). Russian FED, Industar, or Jupiter lenses can be used with Leica screw-mount cameras. Between Russian and Leica screw-mount lenses is a minor difference in the layout of the helicoid thread pitch, but I doubt that it makes a visible impact on film. These lenses still deliver a quite high image quality on digital mirrorless cameras and certainly do on film. Don't expect perfectionism compared to modern lenses (you wouldn't use the IIIc in the first place if this was the case), but they have character in their little faults. There is a huge range of very affordable Russian 50 mm lenses (Jupiter-8 for example). A bit more expensive but also with character are for example screw-mount lenses from Canon and Nikon (> $250).
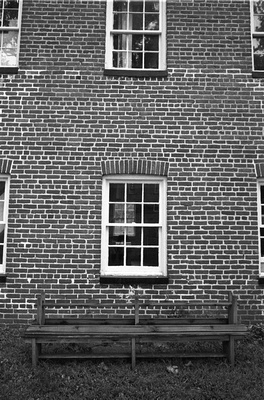
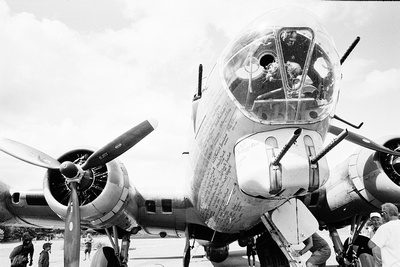
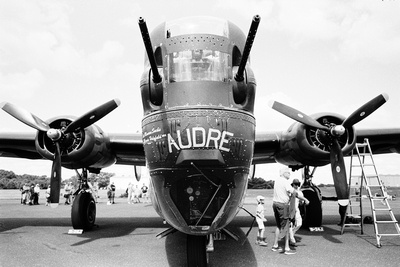
Some recently taken photos with the Leica Summitar 50/2 LTM lens and the Leica IIIc:

Some photos taken with the Cosina-Voigtlander 25/4.0 LTM lens and the Leica IIIc:
Shooting 35 mm Film with Hasselblad 500 C/M
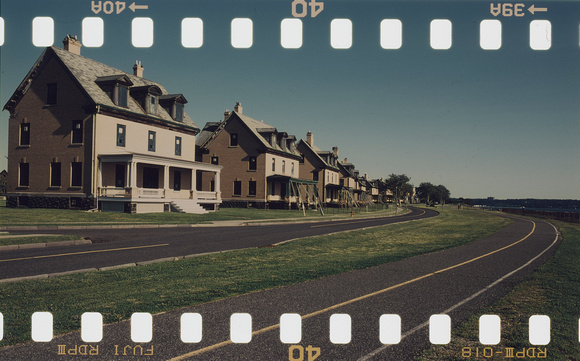
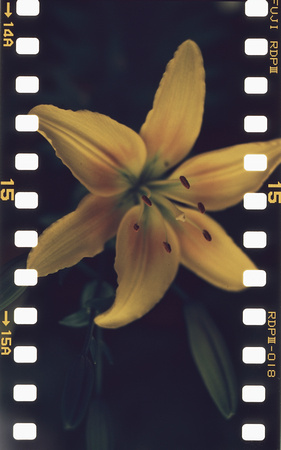
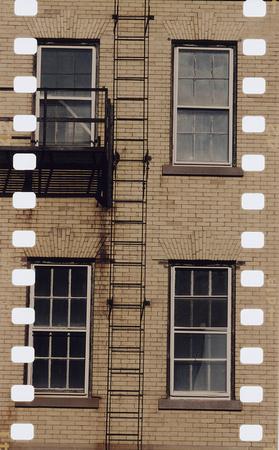
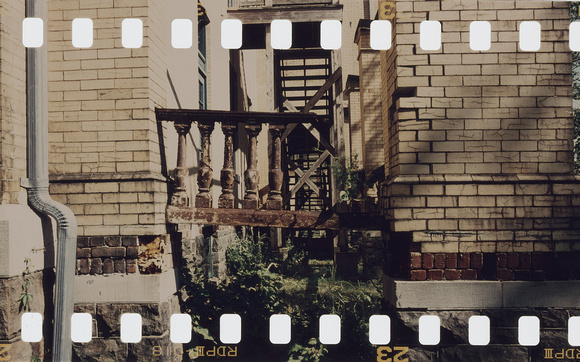
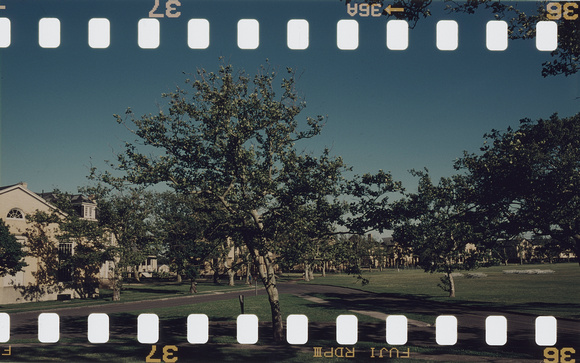
Why would somebody use 35 mm film in a 6x6 based camera when medium-format film size gives you the advantages of higher resolution, less grain, and more shallow depth of field when needed? Two reasons come in mind which made me interested in this topic: being able to shoot panoramic looking 35 mm photos (size of the photo frame is then 60x24 mm instead of 36x24 mm). Second reason is that the film sprockets will be exposed and part of the final photo which is something differently looking.
There are a few blogs online which have brief descriptions how to do this, but from my experience they all lack some crucial details. First, it is never mentioned which Hasselblad film cartridge should be used. In my opinion this is an important point to think about. Hasselblad made basically two kind of 6x6 film cartridges - A12 and A24 types. The A12 type is used with 120 film which is still available today whereas the A24 film cartridge was designed for 220 films which allowed twice as many frames (24 to be exact) on one roll of film than the 120 film (which gives you 12 frames). There is an important difference between both types of film cartridges - and this is the focus plane of the film itself. Hasselblad designed the film cartridges to allow the most accurate focus of the lens onto the film plane. 120 film is a tiny bit thicker than 220 films were - 120 film uses paper backing whereas 220 films miss this paper. This means the focus plane of the film inside the A24 film cassette had to be adjusted a tiny bit closer to the lens since 220 film lacks the paper backing and is therefore thinner. The opposite is the case with A12 cartridges for 120 films. Now let's look at 35 mm films - they are "naked" without any paper backing on top. To allow best sharpness when modifying a Hasselblad cartridge for 35 mm film, I recommend using one of the older A24 film cartridges since the focus point will match closest the one from 220 film. It might still be okay to use A12 cartridges also, but I didn't try and have no idea what kind of cartridges - A12 or A24 - were used by other bloggers. To be on the safe side regarding correct focus, A24 is better, and if you have one sitting around unused since there is no 220 film sold anymore, you might find good use for it this way. When you get an older A12 or A24 cartridge make sure that the light seals are still (a) in place and (b) functioning. I bought my A24 cassette online for less than $40 (they are much cheaper than the A12 ones), but the former owner must have removed the light seals behind the cover. If there is a leak, light enters the film from the side where the dark slide is taken out. I only found out after I shot a film with it, and all frames were overexposed on the left of the frame caused by the light leak. Time to order (or make yourself) light seals and replace the decayed old ones (if even still inside).
35 mm film rolls have actually the same diameter as 120/220 film rolls. This makes it possible to insert a 35 mm roll into the space normally reserved for a medium-format spool within one of the Hasselblad A12/A24 cartridges. You can purchase 35 mm roll adapters for Hasselblad cartridges online which are 3D printed. But you can save quite a few bucks if you cut them yourself. For this you need an empty 120 or 220 plastic spool and a sharp knife which can also act like a saw (I used my Leatherman knife for this task successfully). One thing is very important here: one needs to be a bit taller than the other one, otherwise the 35 mm film won't be centered within the film cartridge! The difference is only a few mm - so don't cut one half too far first, test by setting both of them with a 35 mm film roll into the cartridge and grind away more if needed. The final stems don't have to look pretty, and the 35 mm film roll will often be a bit wobbly, but this is not a deal breaker for the application.
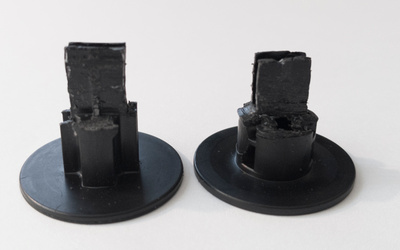
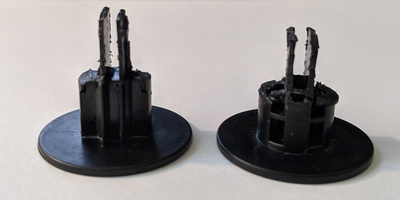
Cut-out medium-format spool stems. The 35 mm film roll comes in between them. Make sure one is a bit taller than the other one to have the film centered in the A24 cartridge.
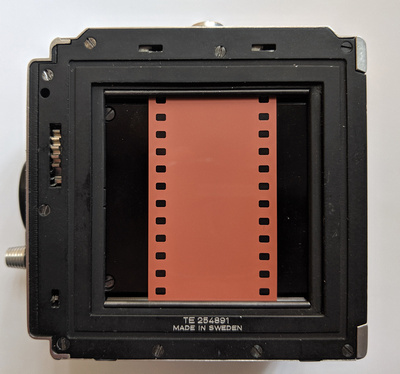
Fit the taller one at the bottom of the 35 mm film roll, and the smaller one on top - this will make the film centered on top of the black screen on the back of the film holder unit. Place the film roll that the emulsive side of the film (in this photo the red colored slide of the Fuji Provia 100F slide film within a self-rolled Kalt film cassette) points to the outside. Reel the film onto an empty 120/220 spool on the opposite side similar how it is done with medium-format film. Turn the take-up spool a few times to ensure the film is not coming loose from this spool.
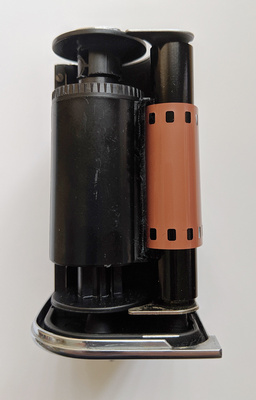
Inserted self-rolled 35 mm film cartridge inside an A24 Hasselblad medium-format film cartridge. Make sure the emulslve side of the film points outside that it can be exposed later.
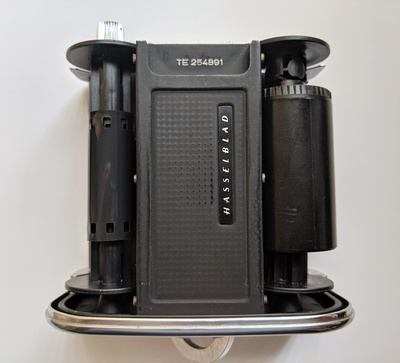
If everything was done right, the film should look like this below (left photo) and within the inserted film holder unit inside the A24 cartridge after the dark slide is removed (right photo). Make sure the film strip is fairly centered in the 6x6 frame showing the light sensitive surface of the film. Important: when the closed cartridge is now added to the Hasselblad camera, it will expose the frame in the vertical direction! This is great for portraits but less desired for landscapes. To get a horizontal panorama, the camera (plus cartridge) must be rotated 90 degrees. I find a 45 degree prism finder very useful here since it still allows me to focus and compose the image in this camera position.
Reel the film towards the "1" position on the cartridge and then take the first frame twice to make sure the first frame is not overlapping with some already exposed film part when it was inserted.
An additional advantage of the A24 cartridge is that you will never run out of 60x24 mm frames of the inserted roll of film. You should get about 18-20 frames from a 36 frame roll of small film. When using an A12 cartridge, you need to disengage the whole cartridge when the seemingly last shot was taken to allow the camera to reset the counter and winding on. Again, much easier and safer with the A24 here!
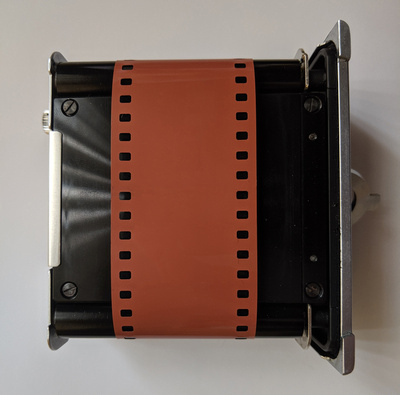
Inserted 35 mm film with the red colored emulsive side on top (left). The film holder is then inserted into the A24 cartridge (right). The film then lays straight on the plate below.
When the film is actually finished, you can't wind-off the film like you would do with a 120 or 220 medium format film. The 35 mm has no more capacity to wind anywhere further, and you also can't rewind it into the original 35 mm cassette. You have to open the cartridge in the pitch dark or inside a bag and directly reel the film from the take-up spool onto a development reel fitting to the used film development tank. Some examples taken with Fuji Provia 100F film below (developed myself with E-6 process chemicals). Sometimes the exposed sprockets add an additional guide to the scene especially when horizontal or vertical lines are present. In any way, the sprockets with numbered frame and film information makes the photo unique and automatically watermarked!