Shooting 35 mm Film with Hasselblad 500 C/M

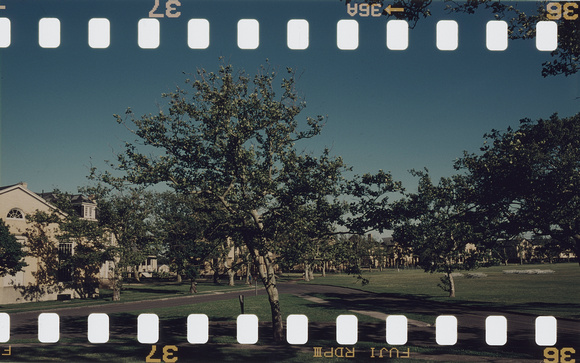
Why would somebody use 35 mm film in a 6x6 based camera when medium-format film size gives you the advantages of higher resolution, less grain, and more shallow depth of field when needed? Two reasons come in mind which made me interested in this topic: being able to shoot panoramic looking 35 mm photos (size of the photo frame is then 60x24 mm instead of 36x24 mm). Second reason is that the film sprockets will be exposed and part of the final photo which is something differently looking.
There are a few blogs online which have brief descriptions how to do this, but from my experience they all lack some crucial details. First, it is never mentioned which Hasselblad film cartridge should be used. In my opinion this is an important point to think about. Hasselblad made basically two kind of 6x6 film cartridges - A12 and A24 types. The A12 type is used with 120 film which is still available today whereas the A24 film cartridge was designed for 220 films which allowed twice as many frames (24 to be exact) on one roll of film than the 120 film (which gives you 12 frames). There is an important difference between both types of film cartridges - and this is the focus plane of the film itself. Hasselblad designed the film cartridges to allow the most accurate focus of the lens onto the film plane. 120 film is a tiny bit thicker than 220 films were - 120 film uses paper backing whereas 220 films miss this paper. This means the focus plane of the film inside the A24 film cassette had to be adjusted a tiny bit closer to the lens since 220 film lacks the paper backing and is therefore thinner. The opposite is the case with A12 cartridges for 120 films. Now let's look at 35 mm films - they are "naked" without any paper backing on top. To allow best sharpness when modifying a Hasselblad cartridge for 35 mm film, I recommend using one of the older A24 film cartridges since the focus point will match closest the one from 220 film. It might still be okay to use A12 cartridges also, but I didn't try and have no idea what kind of cartridges - A12 or A24 - were used by other bloggers. To be on the safe side regarding correct focus, A24 is better, and if you have one sitting around unused since there is no 220 film sold anymore, you might find good use for it this way. When you get an older A12 or A24 cartridge make sure that the light seals are still (a) in place and (b) functioning. I bought my A24 cassette online for less than $40 (they are much cheaper than the A12 ones), but the former owner must have removed the light seals behind the cover. If there is a leak, light enters the film from the side where the dark slide is taken out. I only found out after I shot a film with it, and all frames were overexposed on the left of the frame caused by the light leak. Time to order (or make yourself) light seals and replace the decayed old ones (if even still inside).
35 mm film rolls have actually the same diameter as 120/220 film rolls. This makes it possible to insert a 35 mm roll into the space normally reserved for a medium-format spool within one of the Hasselblad A12/A24 cartridges. You can purchase 35 mm roll adapters for Hasselblad cartridges online which are 3D printed. But you can save quite a few bucks if you cut them yourself. For this you need an empty 120 or 220 plastic spool and a sharp knife which can also act like a saw (I used my Leatherman knife for this task successfully). One thing is very important here: one needs to be a bit taller than the other one, otherwise the 35 mm film won't be centered within the film cartridge! The difference is only a few mm - so don't cut one half too far first, test by setting both of them with a 35 mm film roll into the cartridge and grind away more if needed. The final stems don't have to look pretty, and the 35 mm film roll will often be a bit wobbly, but this is not a deal breaker for the application.
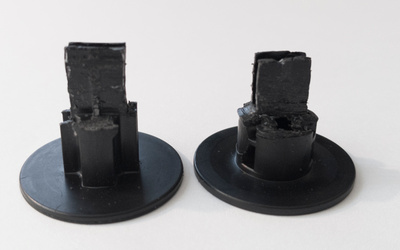

Cut-out medium-format spool stems. The 35 mm film roll comes in between them. Make sure one is a bit taller than the other one to have the film centered in the A24 cartridge.
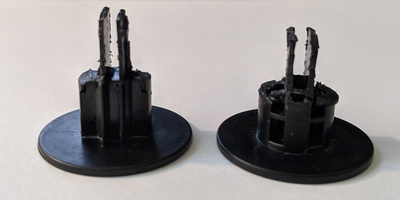
Fit the taller one at the bottom of the 35 mm film roll, and the smaller one on top - this will make the film centered on top of the black screen on the back of the film holder unit. Place the film roll that the emulsive side of the film (in this photo the red colored slide of the Fuji Provia 100F slide film within a self-rolled Kalt film cassette) points to the outside. Reel the film onto an empty 120/220 spool on the opposite side similar how it is done with medium-format film. Turn the take-up spool a few times to ensure the film is not coming loose from this spool.
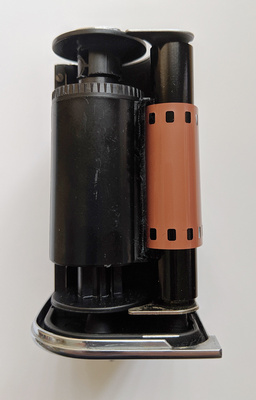
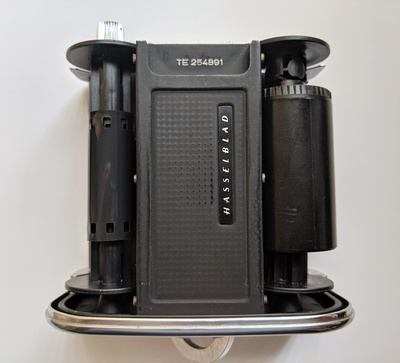
Inserted self-rolled 35 mm film cartridge inside an A24 Hasselblad medium-format film cartridge. Make sure the emulslve side of the film points outside that it can be exposed later.
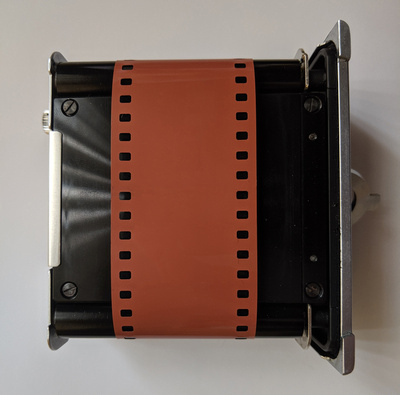
If everything was done right, the film should look like this below (left photo) and within the inserted film holder unit inside the A24 cartridge after the dark slide is removed (right photo). Make sure the film strip is fairly centered in the 6x6 frame showing the light sensitive surface of the film. Important: when the closed cartridge is now added to the Hasselblad camera, it will expose the frame in the vertical direction! This is great for portraits but less desired for landscapes. To get a horizontal panorama, the camera (plus cartridge) must be rotated 90 degrees. I find a 45 degree prism finder very useful here since it still allows me to focus and compose the image in this camera position.
Reel the film towards the "1" position on the cartridge and then take the first frame twice to make sure the first frame is not overlapping with some already exposed film part when it was inserted.
An additional advantage of the A24 cartridge is that you will never run out of 60x24 mm frames of the inserted roll of film. You should get about 18-20 frames from a 36 frame roll of small film. When using an A12 cartridge, you need to disengage the whole cartridge when the seemingly last shot was taken to allow the camera to reset the counter and winding on. Again, much easier and safer with the A24 here!
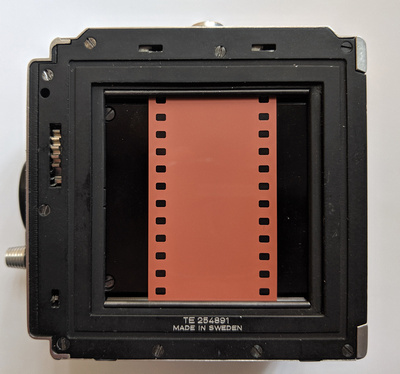
Inserted 35 mm film with the red colored emulsive side on top (left). The film holder is then inserted into the A24 cartridge (right). The film then lays straight on the plate below.
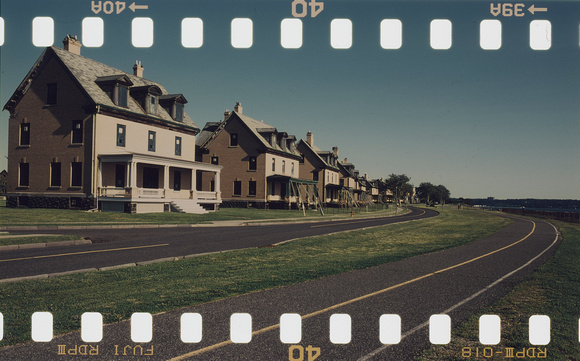
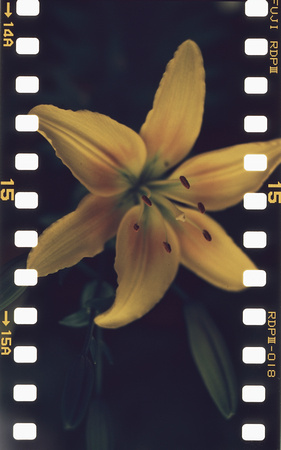
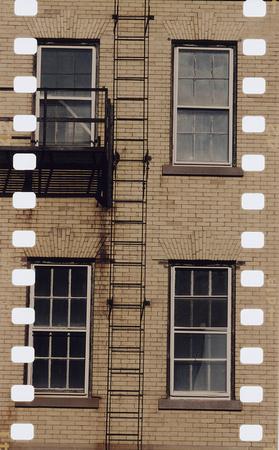
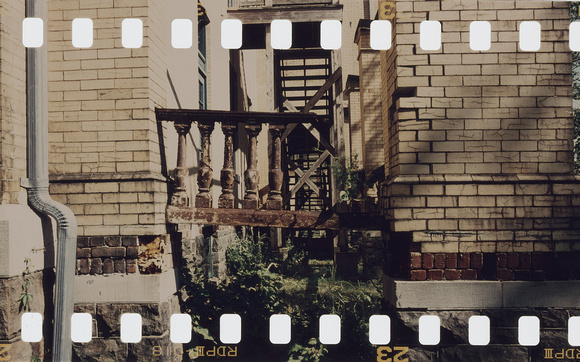
When the film is actually finished, you can't wind-off the film like you would do with a 120 or 220 medium format film. The 35 mm has no more capacity to wind anywhere further, and you also can't rewind it into the original 35 mm cassette. You have to open the cartridge in the pitch dark or inside a bag and directly reel the film from the take-up spool onto a development reel fitting to the used film development tank. Some examples taken with Fuji Provia 100F film below (developed myself with E-6 process chemicals). Sometimes the exposed sprockets add an additional guide to the scene especially when horizontal or vertical lines are present. In any way, the sprockets with numbered frame and film information makes the photo unique and automatically watermarked!