Infrared Full Frame
In the past I used my older Rebel XT (EOS 350D) DSLR camera for infrared (IR) photography simply by attaching a 720 nm infrared filter onto the front lens. Main disadvantage with this method are longer exposure times between 5-15 seconds depending on light conditions. Focusing was a bit tricky, too - this camera has no Live View built in, so I had to rely on experience and the red focus mark on the lens. Several photos were needed to get one decent sharp one. I quickly grew out of this bit of cumbersome infrared shooting technique: I no longer wanted to rely on static objects to take infrared photos of; also I found myself limited by the APC-S cropped sensor in the Rebel camera which made it hard to get a wider field of view with my good wide angle lenses.
The anti-alias and the hot mirror filter (AA/ICF) in front of my full frame 5D II camera is very strong - I can confirm posts of disappointed IR photographers who tried the IR filter-on-lens method with this full frame camera. Very long exposure times about 30 seconds are needed, and unfortunately some regular light passes through due to the very long exposure. The IR photo doesn't look right, the white reflective tones are all greyish looking. Post processing can't resolve this either.
Finally in April 2012 I had a second 5D MkII camera body converted to an infrared camera with 715 nm cutoff filter. To do this, the AA/ICF filters in front of the CMOS sensor had to be replaced. The ultrasonic sensor cleaning was disabled, too - the piezo strips of the cleaning device are directly glued on the AA/ICF which had to be removed.
I have used now my IR camera on many occasions, and it is a blast! I am able to create photo compositions which are just impossible to do in regular light or normal B&W photography. Clouds and foliage appear bright and very rich in contrast, while water is mostly pitch black.
 This moment on the left photo remained only for less than 2 minutes, and I was fortunate just to have my IR camera with lens ready to take a shot of this scenery! This picture in regular color would look much less impressive.
With a 715 nm cutoff filter, still some light will be able to pass through the sensor. By converting the red/blue color channels in post processing, even some sort of color photos are possible. Personally I like it with blue sky in the background and white foreground as seen in this photo below. Especially green foliage (grass, leaves, plants) looks very vibrant in infrared. The chlorophyll in the plant cells is known to reflect infrared light which is registered by the camera. The more infrared an object reflects, the more brighter it will appear in the photo.
This allows to take very contrast-rich photos which cannot be taken in regular light or the same effects achieved by professional post processing software. My converted IR camera can be used in infrared nearly the same as my regular light camera body. Focusing works the same (it is calibrated after the conversion, but I recommend also using microfocus adjustment for commonly used lenses). Metering is a bit more tricky - it can change severely by just moving the camera from a specific angle to the sun for example. Get used to manual mode or at least under/overexposure settings! +/- 1 to 2 stops exposure compensation settings are totally normal.
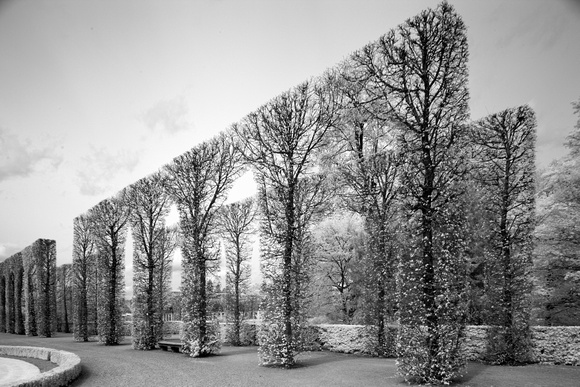
This goes in line with using one of my favorite lenses, the 24 mm f/3.5 tilt/shift lens. I love this lens for architectural and landscape shots since I can avoid distorted lines by shifting and increasing (or decreasing) the depth of field (DoF) by tilting. Now I can use my favorite wide angle lens in infrared, too! The photo below which was taken inside a castle garden could not be accomplished with a regular 24 mm wide angle lens - do you see the straight vertical tree lines? Infrared gives the additional "touch" by showing the young leaves and bushes in a bright contrast to the dark tree stems.

Other than nature, IR photography is a useful tool in the mechanical/technical area. Its better contrast-rich photos bring out details a lot better and appealing. The HDR (high dynamic range) photo below of an opened turbine of a FedEx cargo airplane was taken at 17 mm focal length. Small differences in light give a glow to some tubes and parts, while other structures remain darker.
Last but not least my IR-converted full frame camera allows to take appealing portrait shots! One IR portrait photo of mine can be seen in the "About" section of my website here. Skin looks smoother and more even than in regular light.
Please feel free to check out my infrared photos on my website! They can be found in several galleries, with some of them in the infrared gallery.